

Kyle Builds the Monogram 1/48 F-105G Wild Weasel — Build Feature
Kyle Builds the Monogram F-105G Wild Weasel: You Gotta Be $hittin' Me!
Monogram 1/48 F-105G Thunderchief · MON5806 · Full Build Feature
As the story goes, "You Gotta Be $hittin' Me" were the words uttered by a member of the first group of Wild Weasels when told what their new role would entail. They were also Kyle's words when he found the single photograph that inspired this entire build.
Kyle found a bargain-bin, bagged Monogram 1/48 Thunderchief and decided to put his money where his mouth is - he's been known to talk smack about vintage kits. What followed was a deep-dive research project as much as a modelling one. That one photograph: F-105G serial 62-4425 of the Georgia Air National Guard, photographed May 14, 1982 - with a large RCAF roundel on the tail fin.
Built as an F-105F in 1964 and converted to a G in 1970, 4425 flew the last Wild Weasel mission of Operation Linebacker II in December 1972. It transferred to the Georgia ANG in 1978, served until 1983, and now rests outside an American Legion in Michigan. Kyle's kit started life as an F variant too - so he converted it, just like the real aircraft.
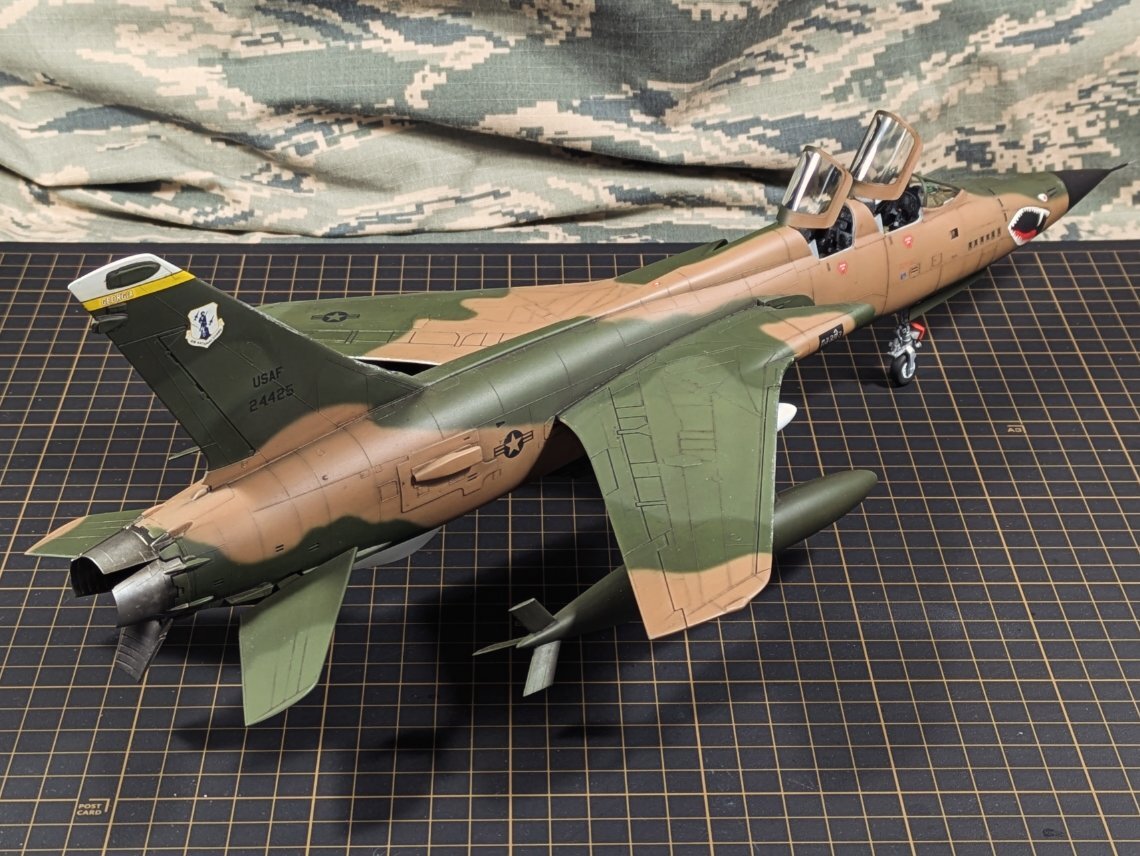
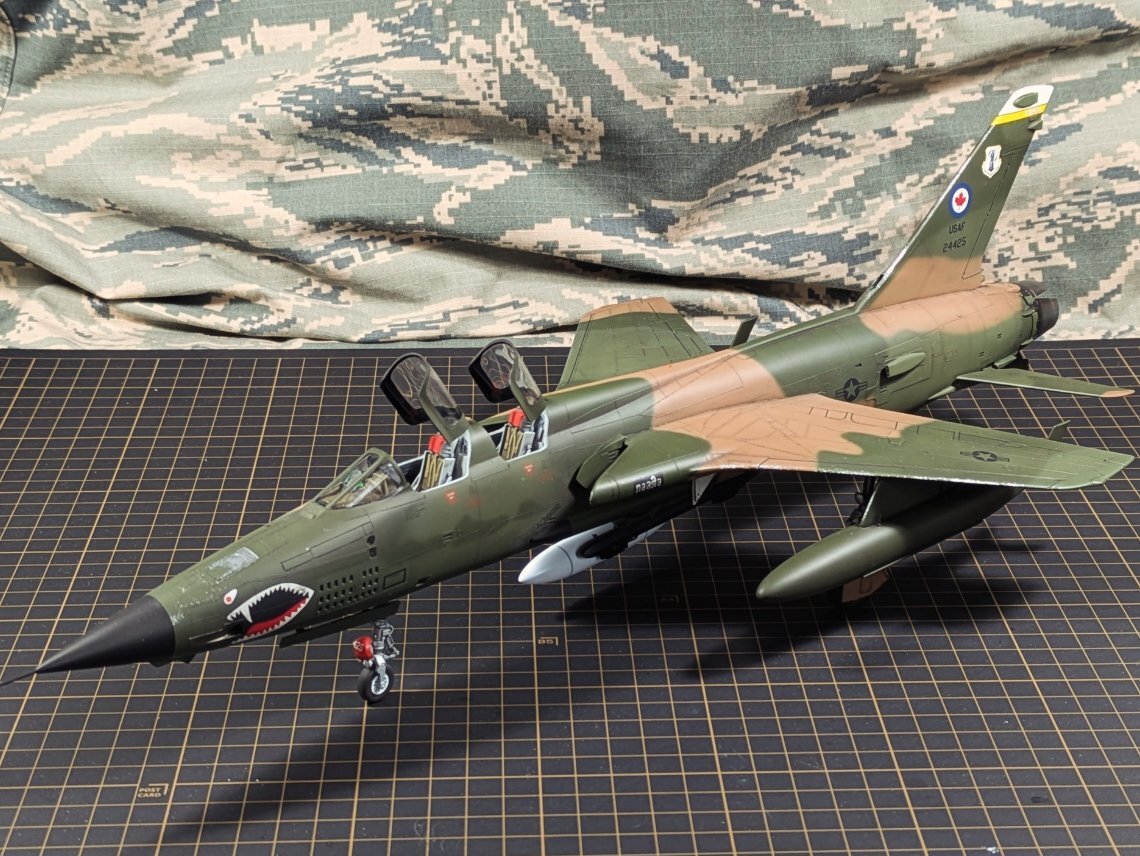
Kyle's completed F-105G Thunderchief - 62-4425, Georgia Air National Guard.
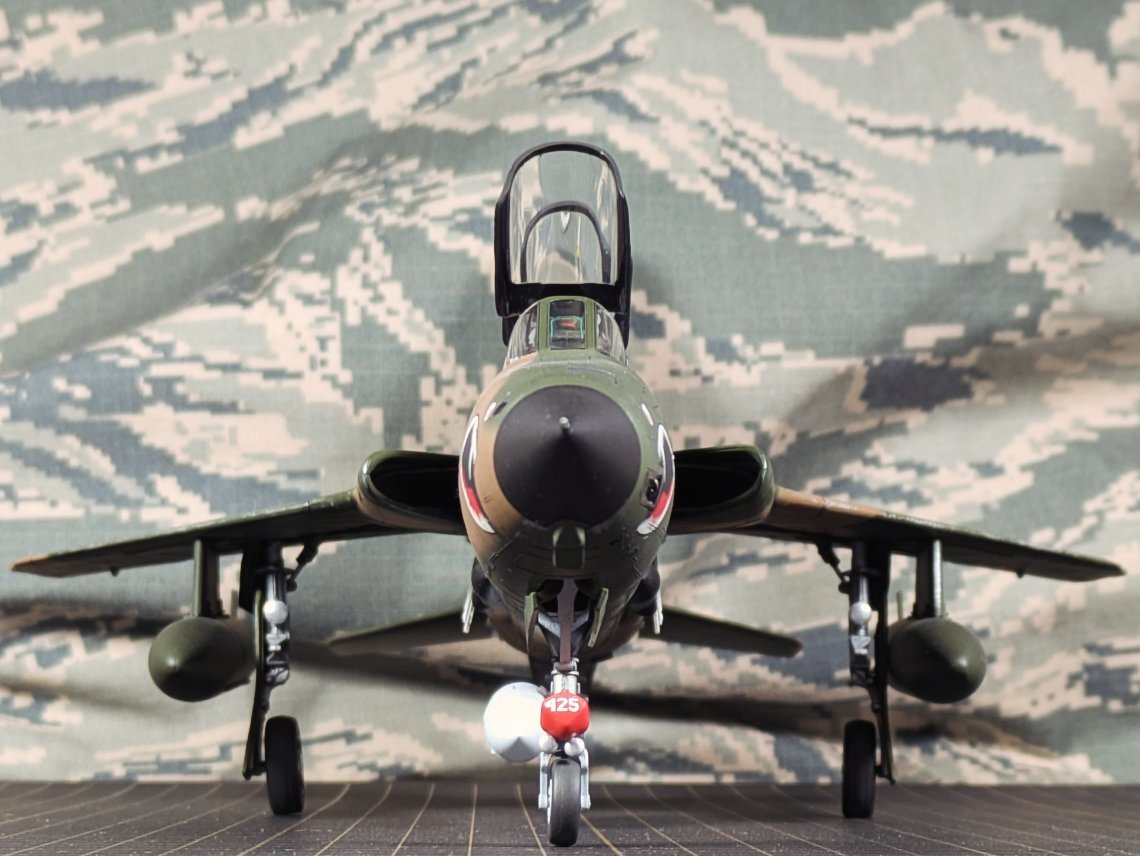
Three-quarter front
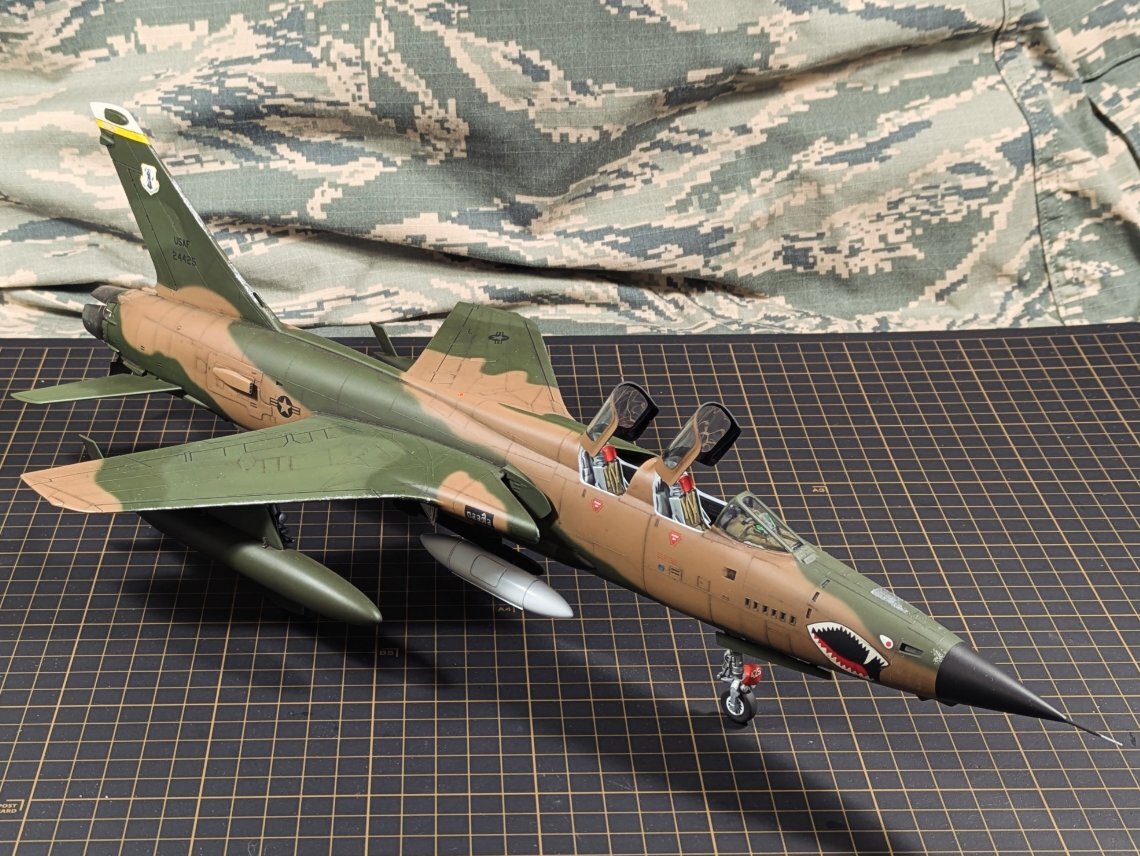
Three-quarter rear
Three-quarter front
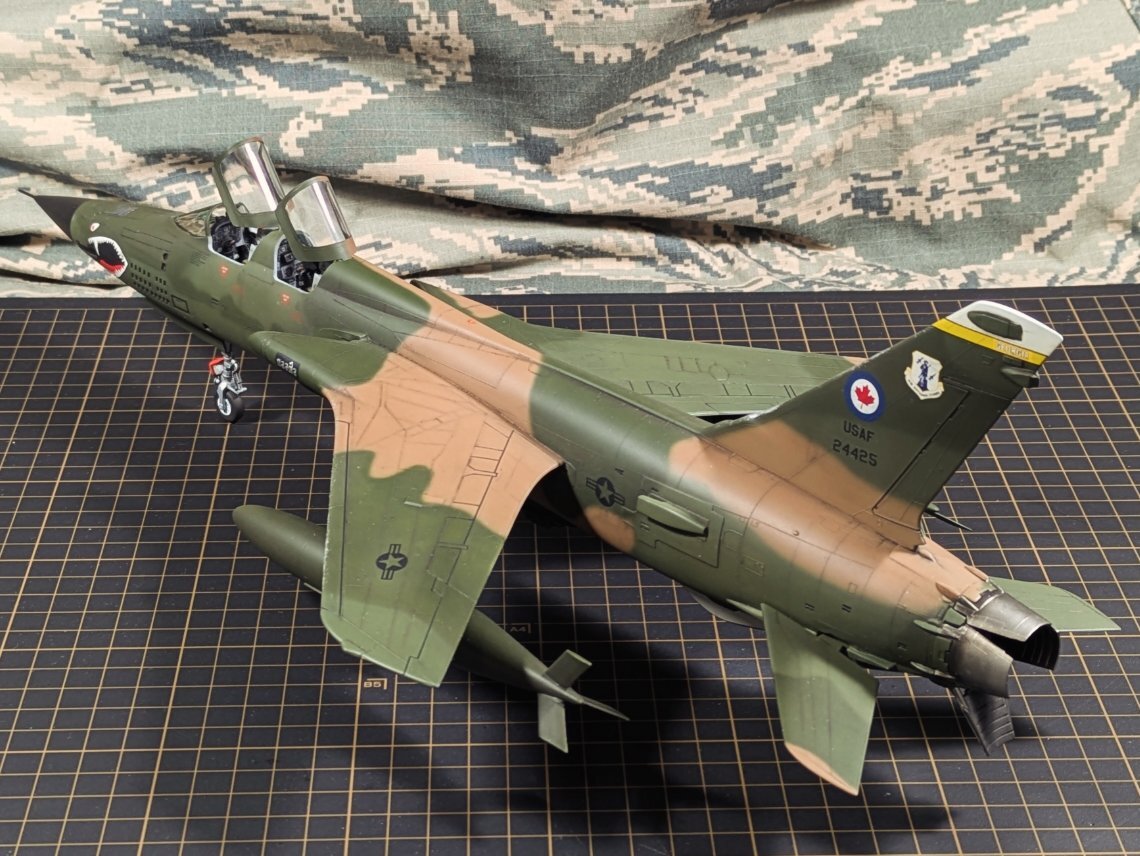
Three-quarter rear
The Reference: One Photograph, One Rabbit Hole
The non-standard wrap-around SEA camouflage worn by the Georgia ANG Thuds was unique to each aircraft - no two were the same. Kyle had reference photos of the left and right sides only; the top and bottom were best-guess. AK and Vallejo acrylics were used, deviating slightly from official USAF colours to better match what was visible in the photographs.
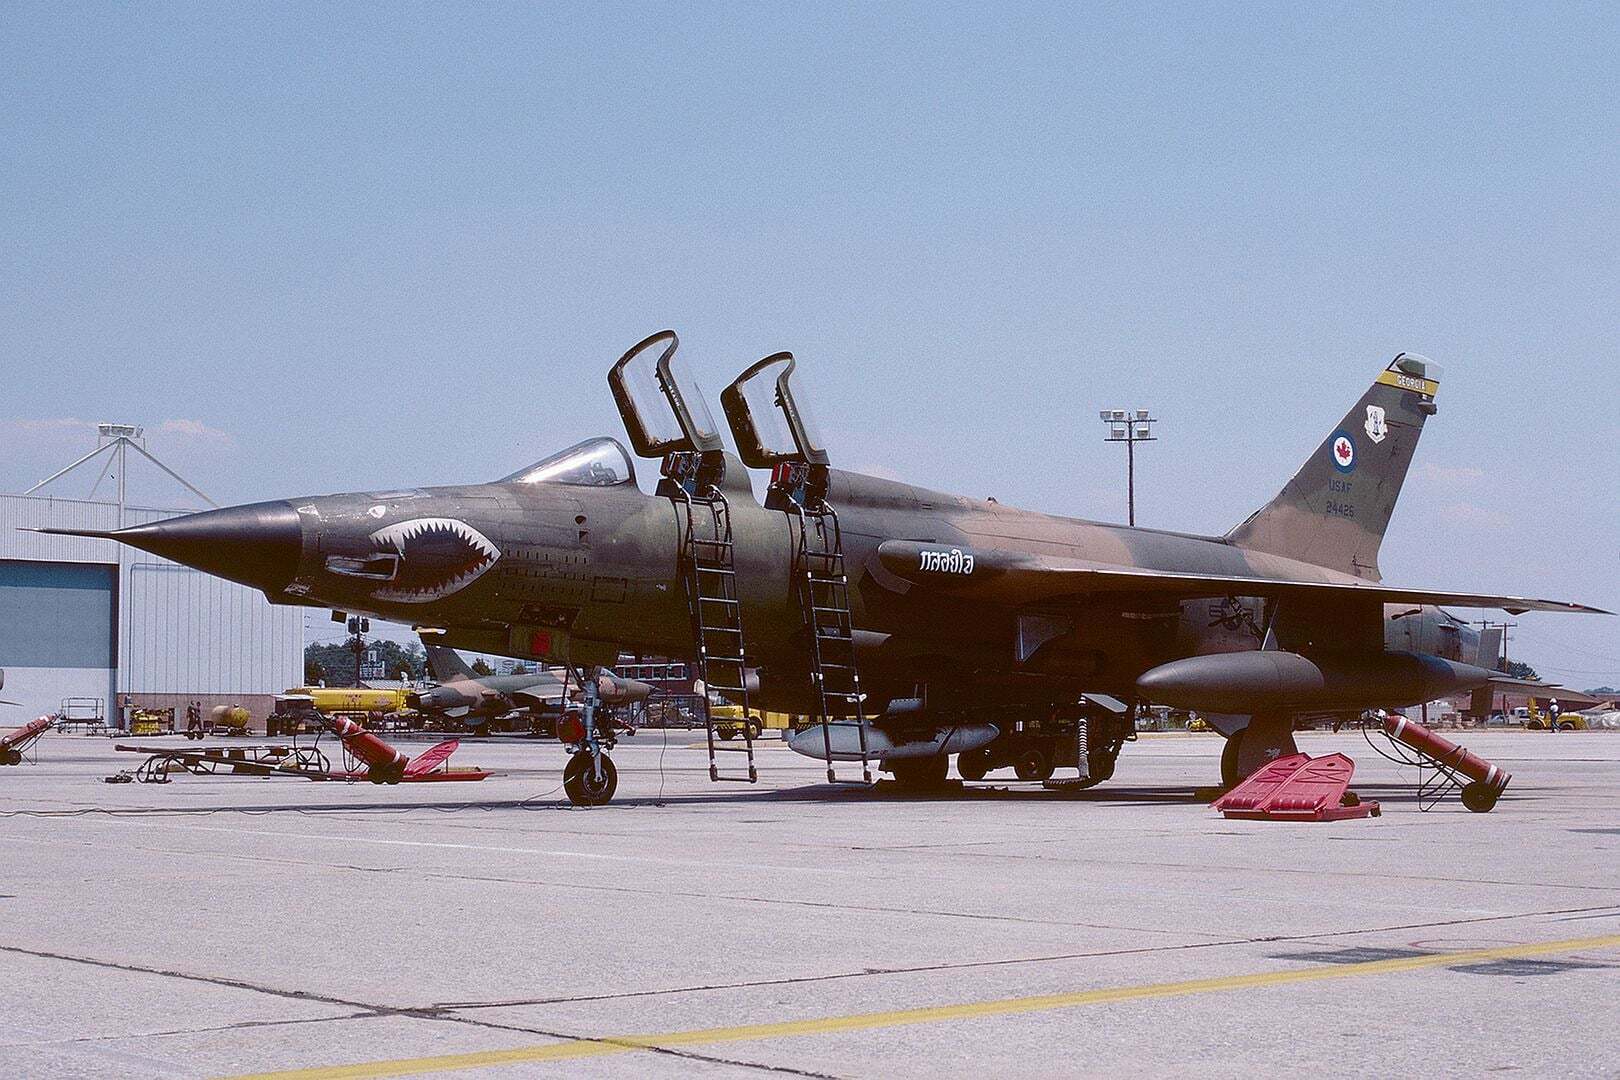
62-4425, Georgia ANG, May 14, 1982 - the photo that started it all. Note the RCAF roundel on the fin.
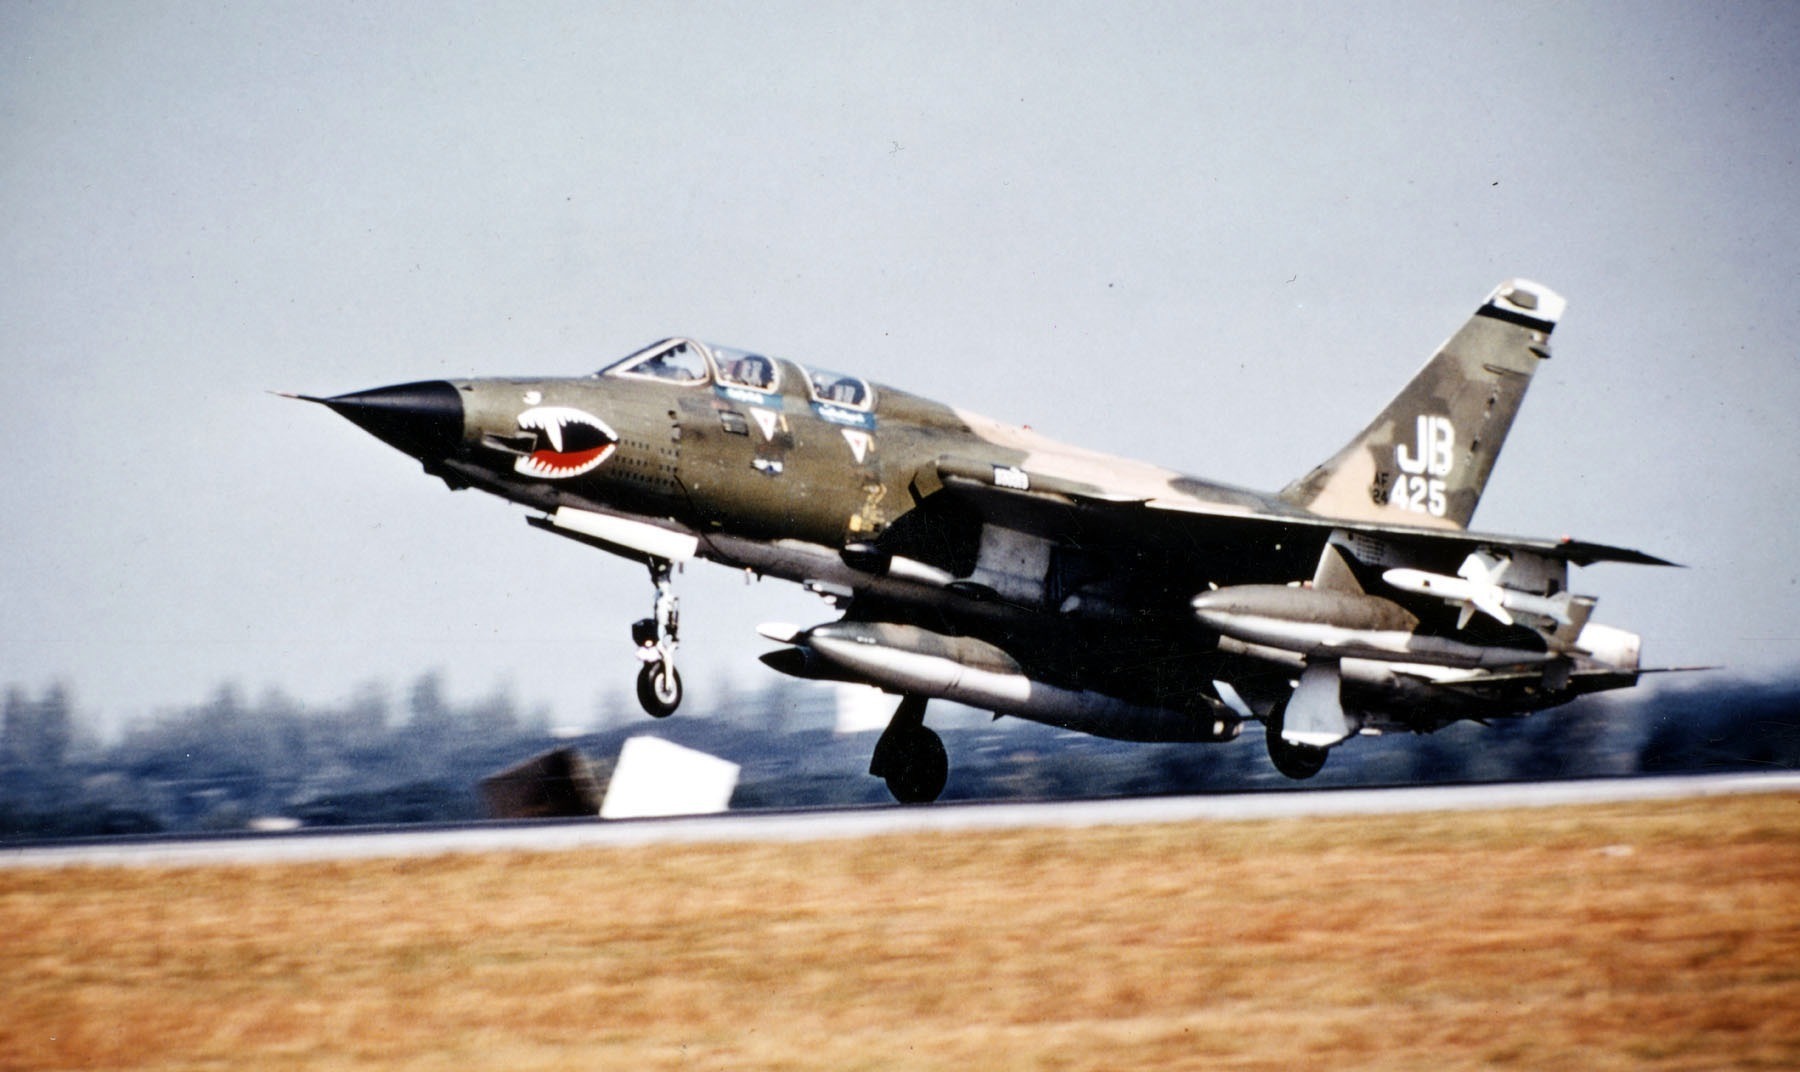
Reportedly 62-4425 on its last Wild Weasel mission, Operation Linebacker II, December 1972.
How Kyle Built It: Techniques and Paints
A full step-by-step breakdown. Most products are in stock at Wheels & Wings, with notes on alternatives where applicable.
Restoring Lost Detail with Stretched Sprue
Due to the age of the kit, the seam lines were quite prominent, though not bad. Removing them took the raised panel lines with them as collateral damage. Kyle restored the lost detail using a classic technique: stretching sprue. Heat a straight section of sprue over a candle or lighter until pliable, then pull it as far as it will go - the thinned section becomes a fine filament that closely matches 1/48 panel line width. Surface sanded up to 1000 grit, sections of stretched sprue are laid point-to-point and secured with quick-set Tamiya cement, working fast to avoid melting the delicate strand.
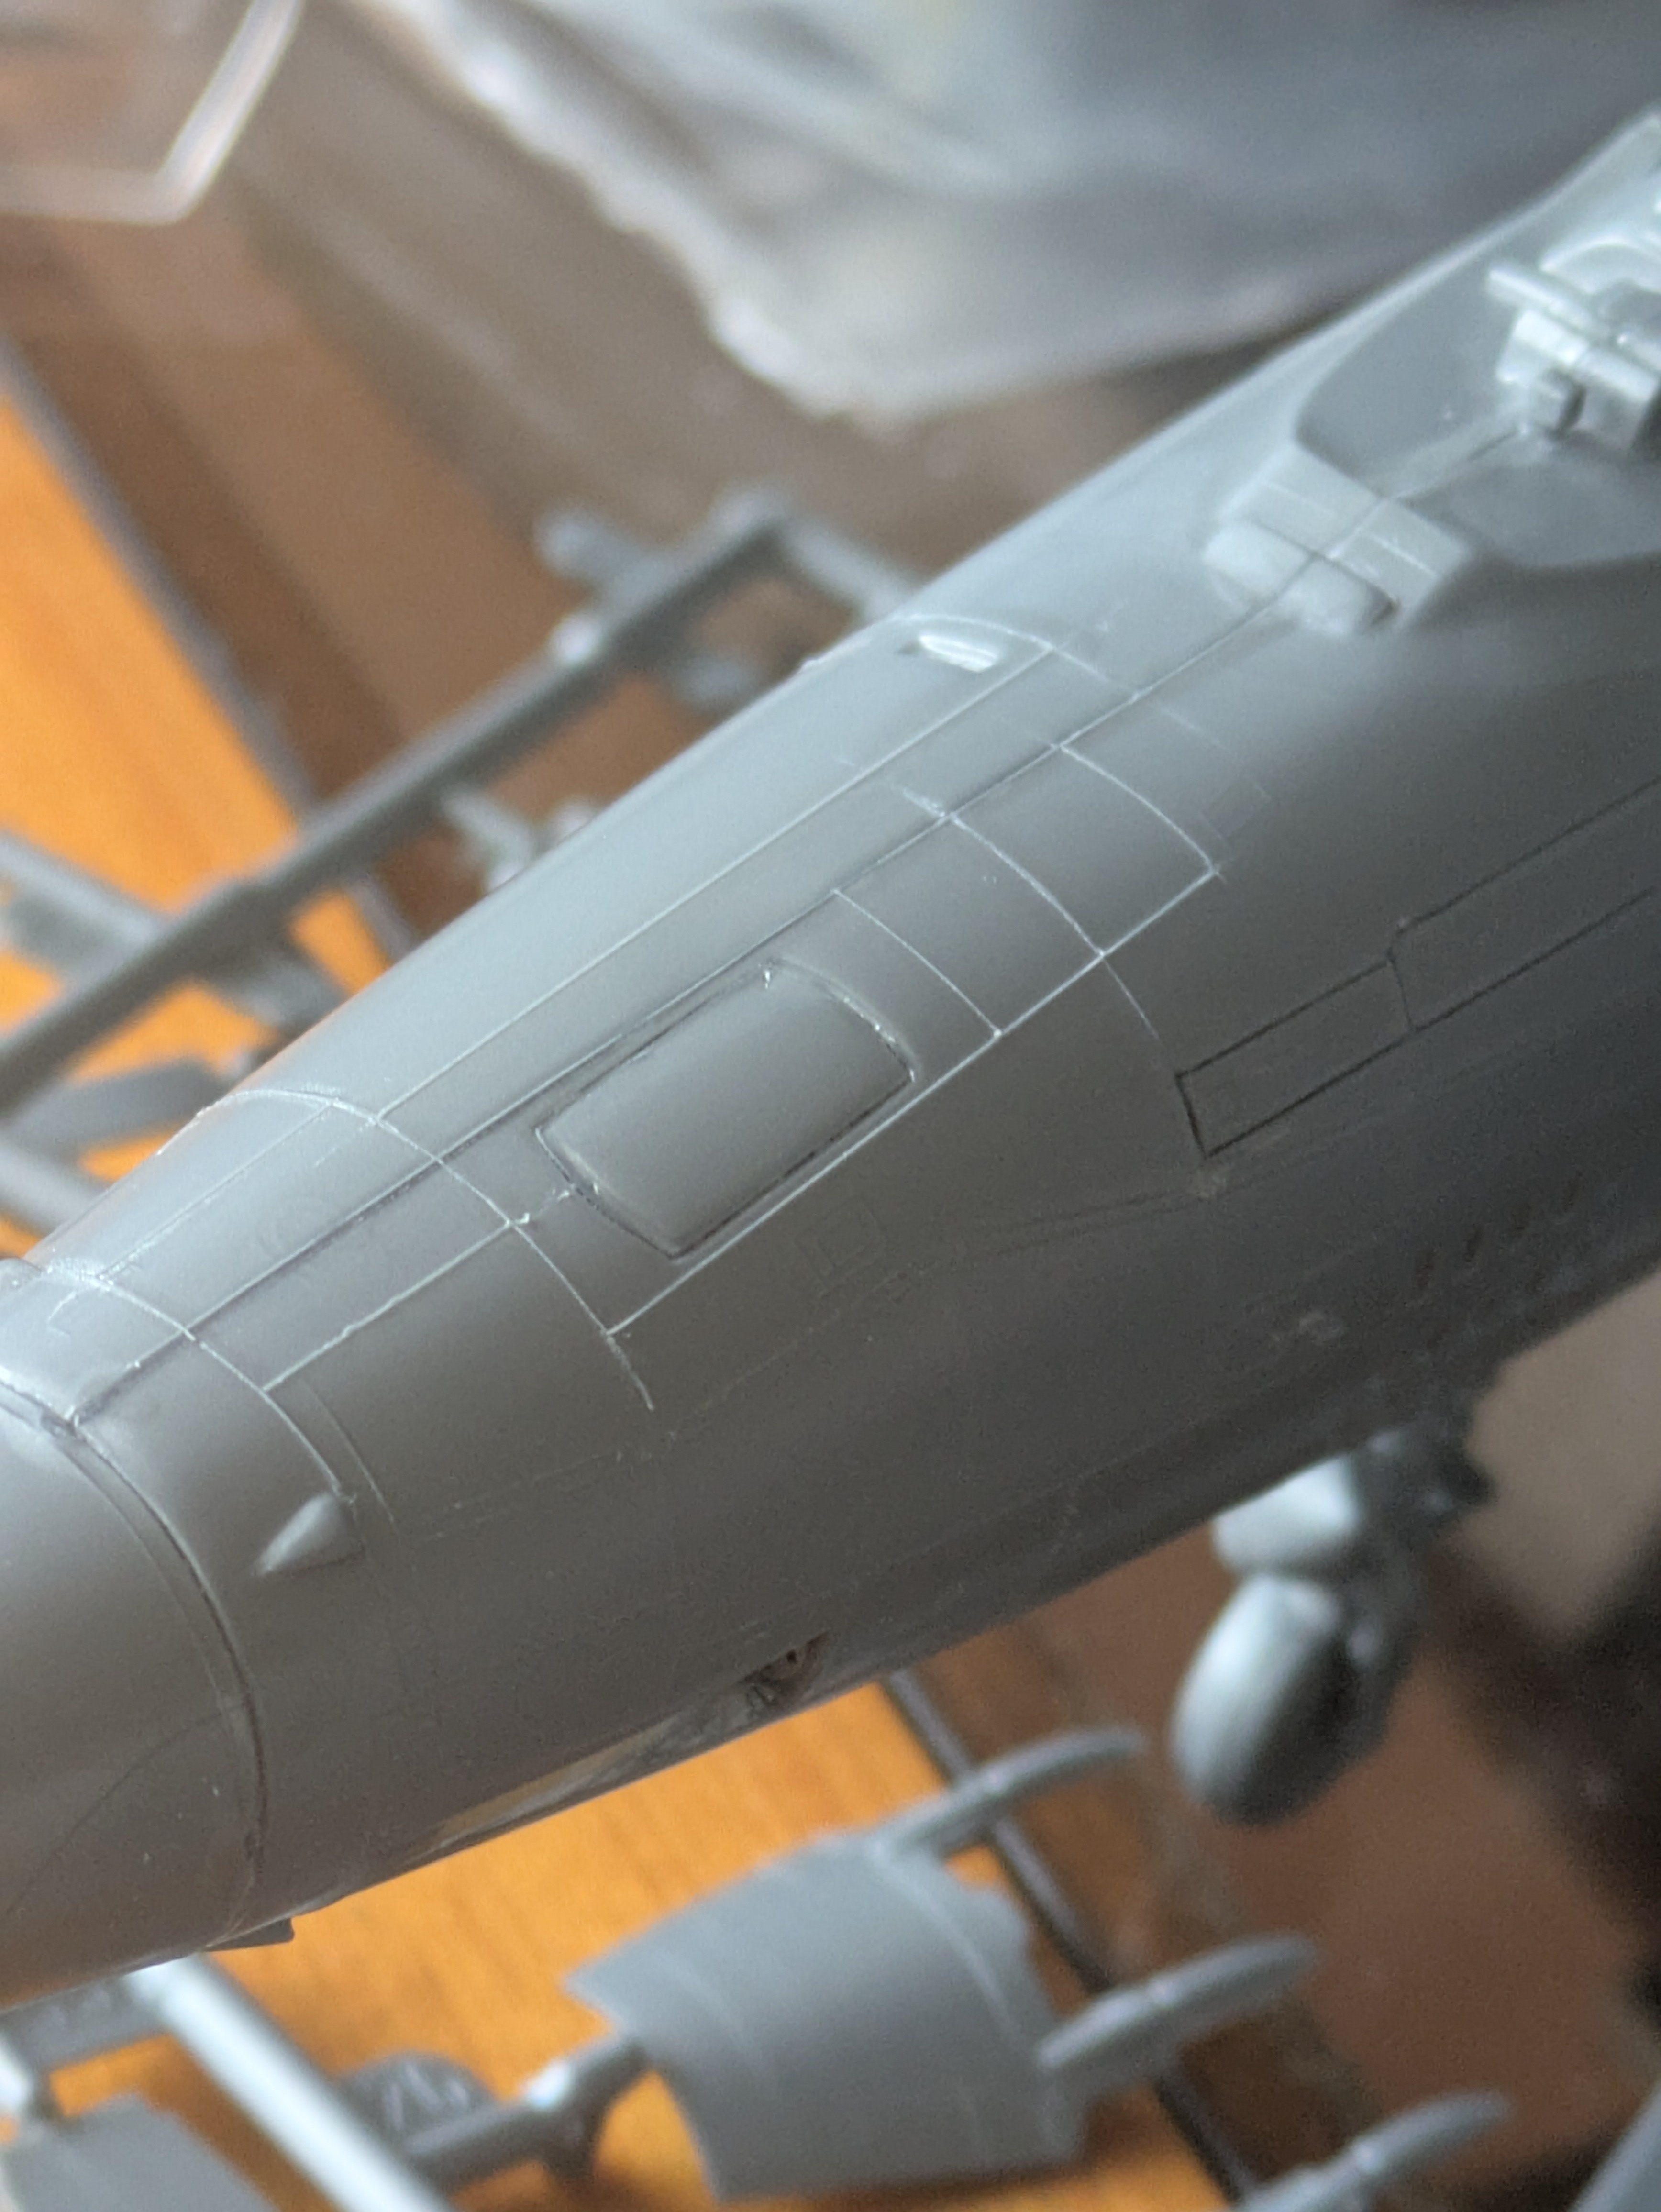
Panel lines restored using stretched sprue, glued point-to-point
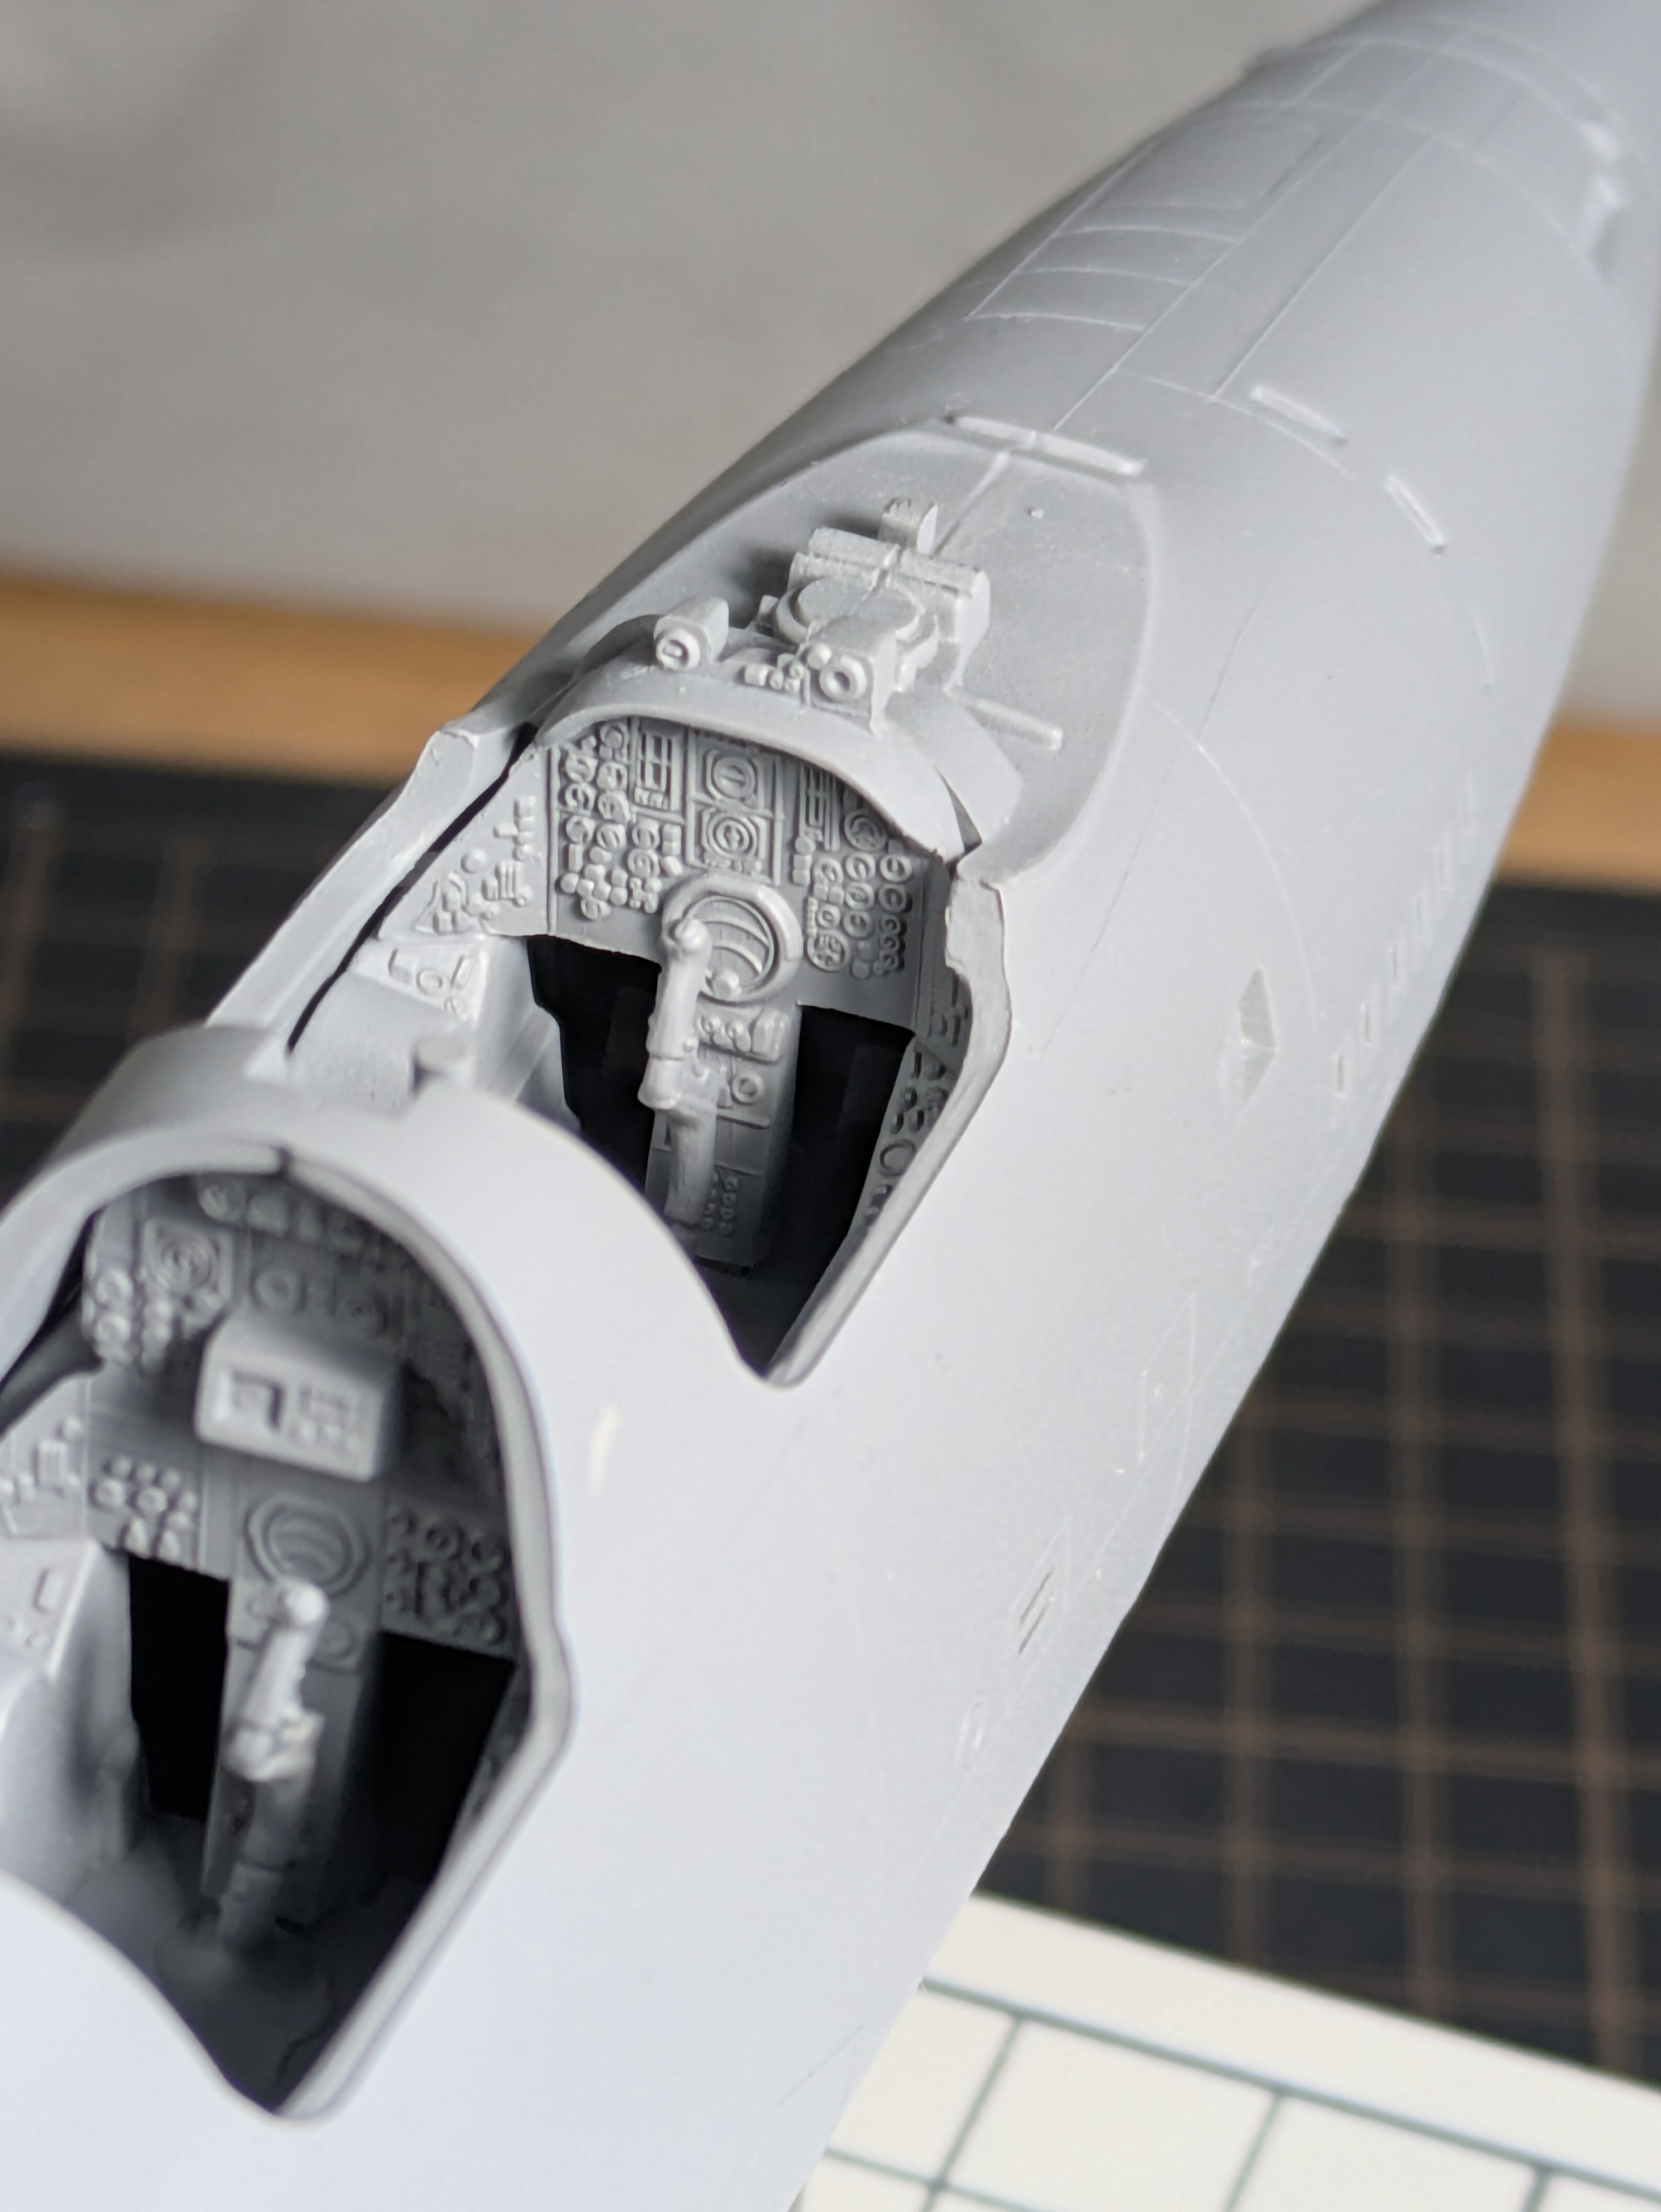
Restored panel lines alongside the out-of-box cockpit and instrument panel
Darkened Grey Primer & Reddish Pre-shade
Kyle started with Vallejo Mecha Primer Grey as the base, adding drops of Mecha Primer Black until the desired darkened tone was achieved - a simple way to tune grey primer depth without committing to a full black base. Over that, Game Air Charred Brown was airbrushed as the pre-shade pass. The dark reddish-brown reads as a strong, warm shadow under the SEA greens and tan of the main scheme.
Non-Standard Wrap-Around SEA Camouflage
The Georgia ANG Thuds wore a non-standard wrap-around version of the Southeast Asia scheme - no two aircraft were identical. Kyle deviated from the official USAF colour call-outs to better match his reference photographs. Colours were applied light to dark: tan first, then the two greens working up to the darkest last.
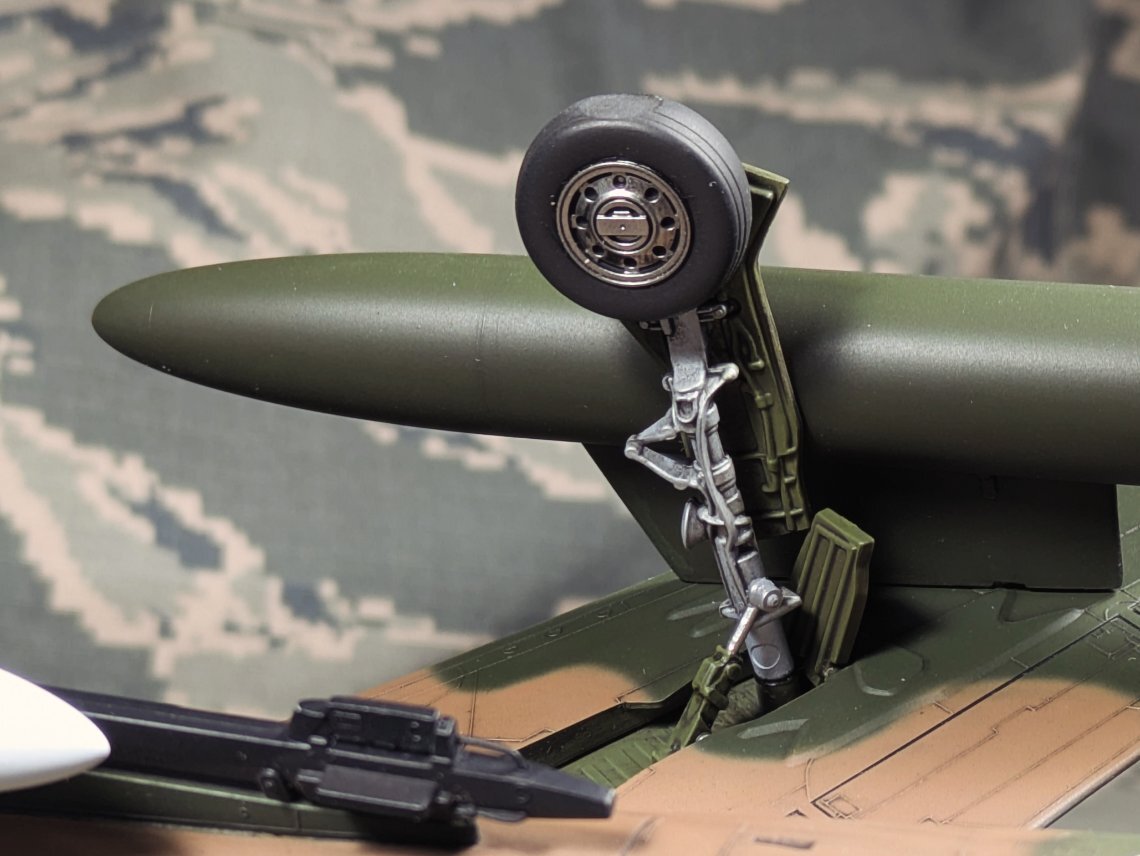
For the dominant dark green, Kyle chose AK11809 PC10 Late over the kit-suggested AK11346 Forest Green FS34079 - it reads darker and more brown in photographs, matching the faded, sun-weathered appearance of the actual aircraft. The fuel tanks were painted the same dark green. The ECM conversion pods along the lower fuselage sides (scratch-built from AGM-78 missile halves from a Hasegawa donor set) were treated as part of the airframe.
AK11121 Tan Earth AK Interactive 3rd Gen - tan areas of the wrap-around scheme
AK11809 PC10 Late AK Interactive 3rd Gen - darker and more brown than FS34079; chosen to match reference photos
Interior - Out of Box
The cockpit was built straight from the box. The tub and seats were airbrushed in Vallejo Light Ghost Grey primer - a useful shortcut that primes and base-coats in one step. Console panels and gauges were picked out with flat black, switches highlighted with white and red. Seat cushions were painted in two tones: Brown Violet for the main body and Khaki for the seatbelts.
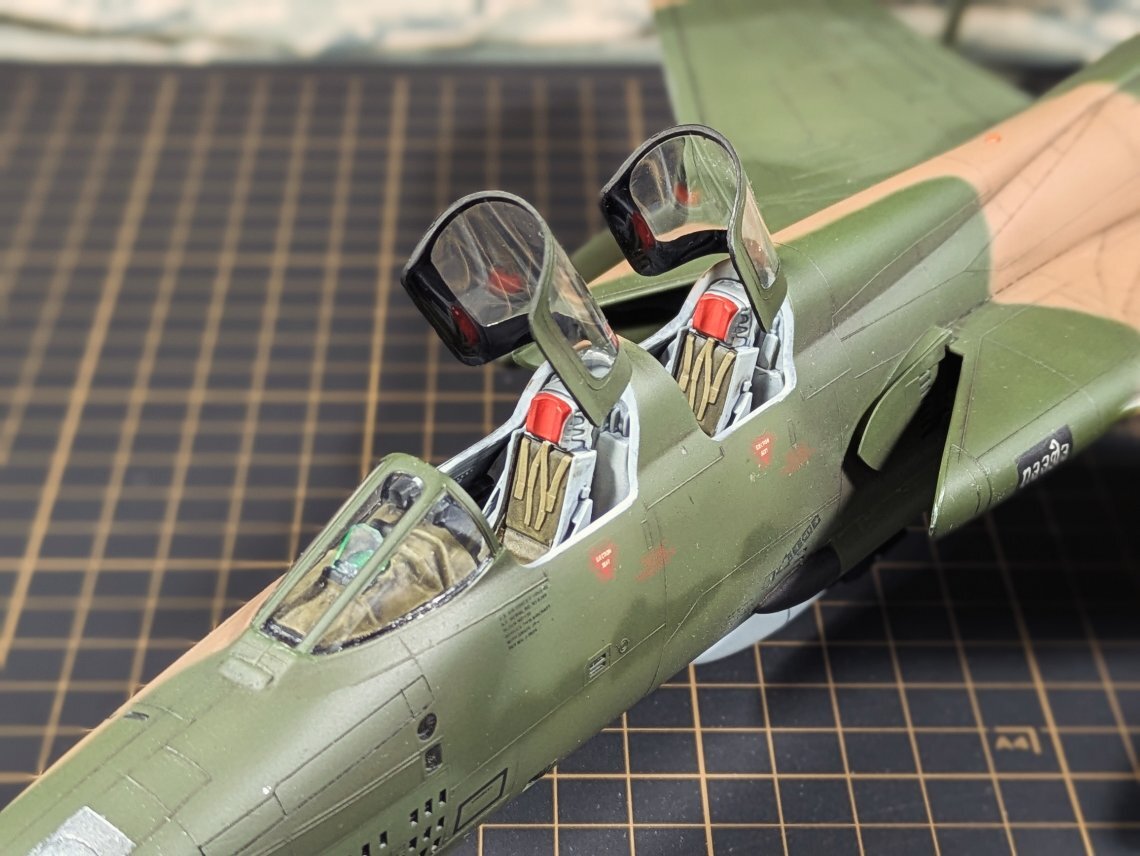
Cockpit overview
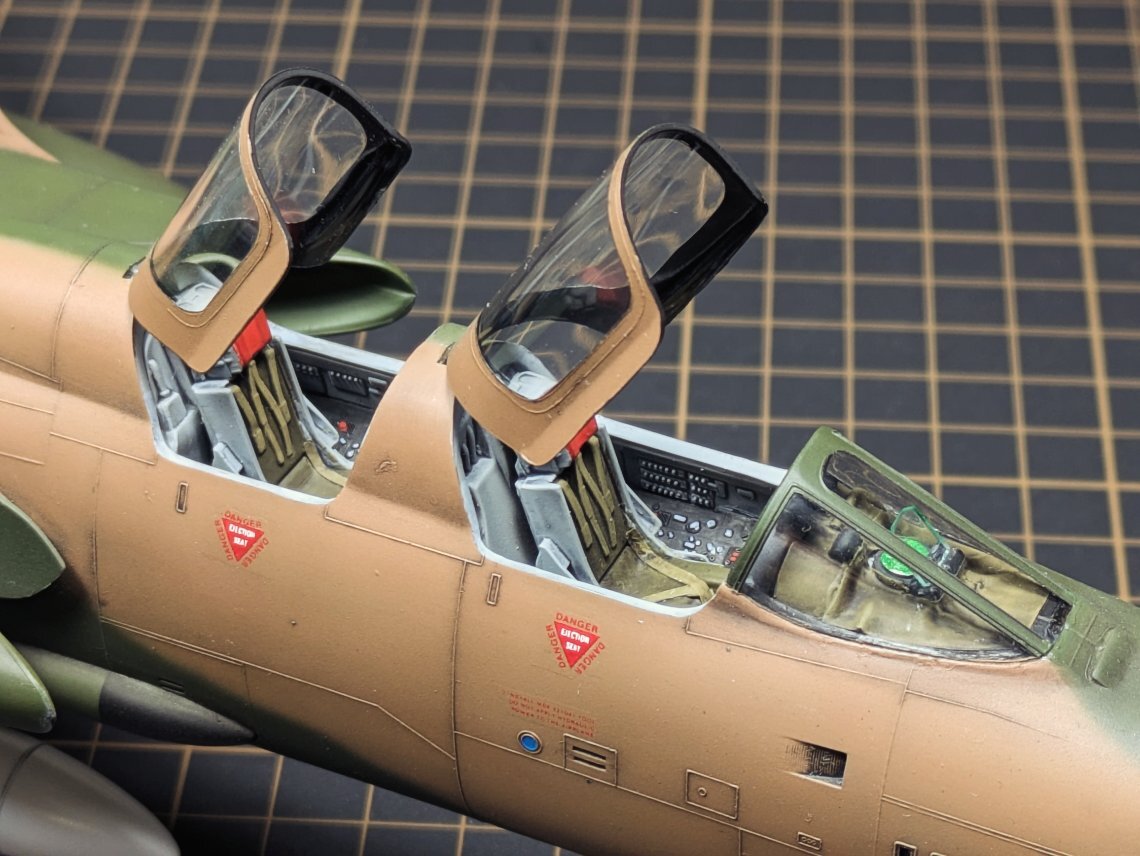
Instrument panel
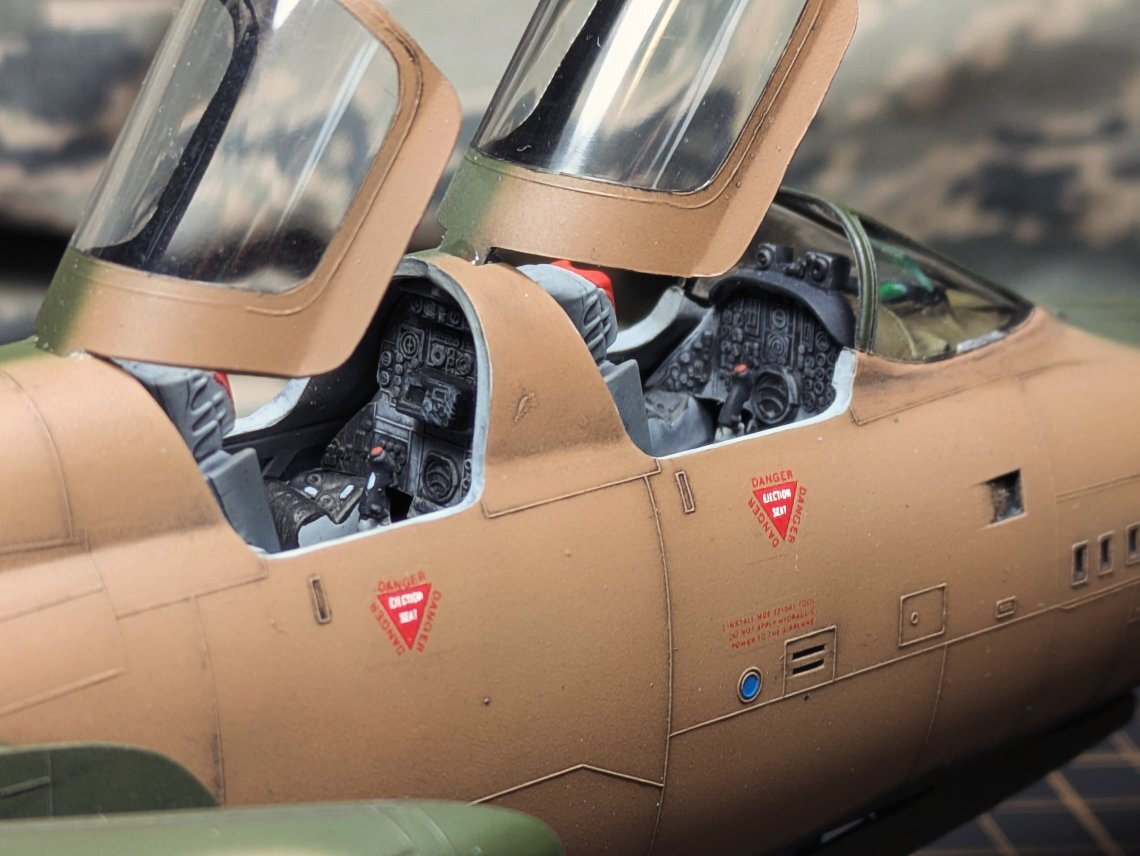
Seats and detail
Gunmetal & Burn Tinting
The engine nozzle was painted gunmetal, then tinted with black wash in the burnt heat-stained areas around the exhaust. Kyle used Vallejo Mecha Color Gunmetal with a black wash as the readily available combination - this replicates the scorched metal appearance of the J75 nozzle well at 1/48 scale.
Wheels, Wells & the 425 Badge
The landing gear received a detailed treatment: wheels in gunmetal, legs in silver, inner doors and well areas in Goblin Green (the standard US Navy/USAF interior green), with a Starship Filth wash throughout to add grime and age. The "425" badge on the nose gear door is hand-painted red with white 1/48 numeral decals sourced from a generic aftermarket sheet.
Landing gear detail
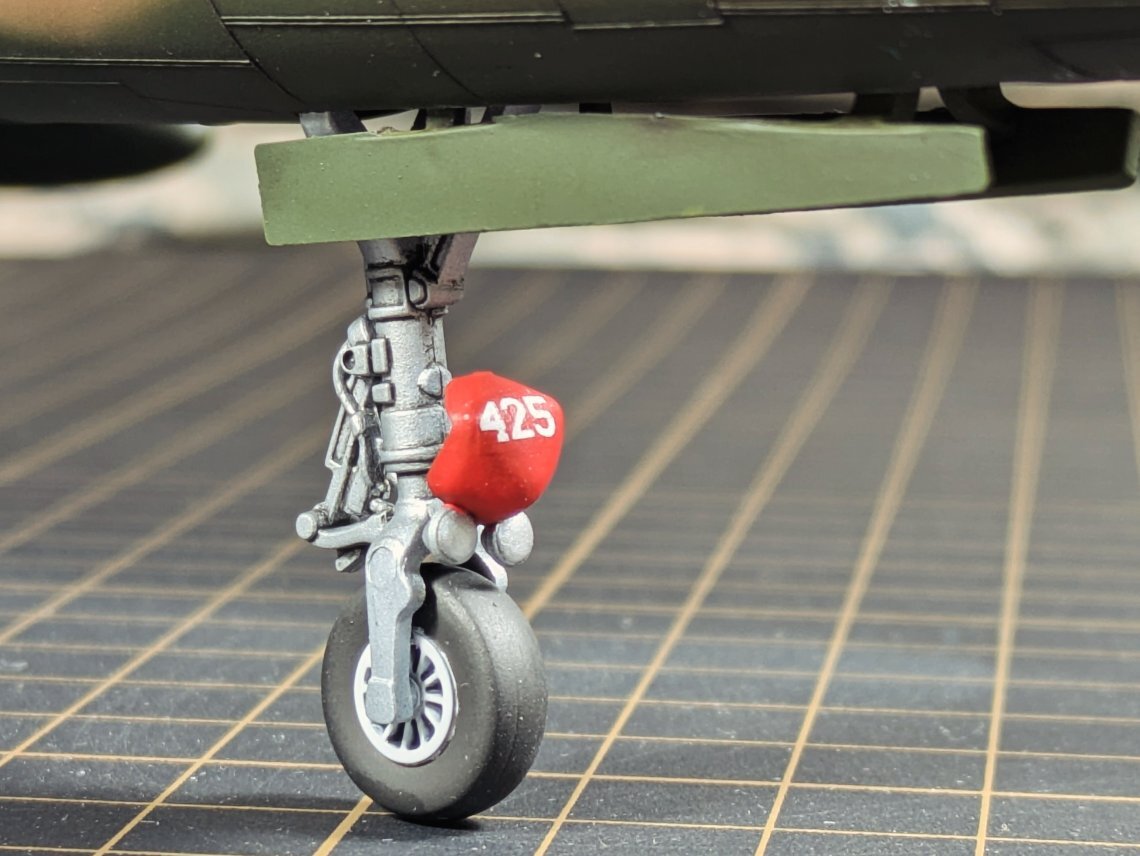
Nose gear door - the “425” badge, red with white decal numerals
ECM Pods, Luggage Pods & Conversion Work
Kyle started with an F variant kit and converted it to a G - mirroring the history of the real aircraft. The integral ECM pods along the lower fuselage sides were scratch-built from AGM-78 missile halves from a donor Hasegawa set (not required if building the F-105G kit directly). The white luggage pods were scratch-built from spare drop tanks off a donor Monogram F-84 Thunderstreak.
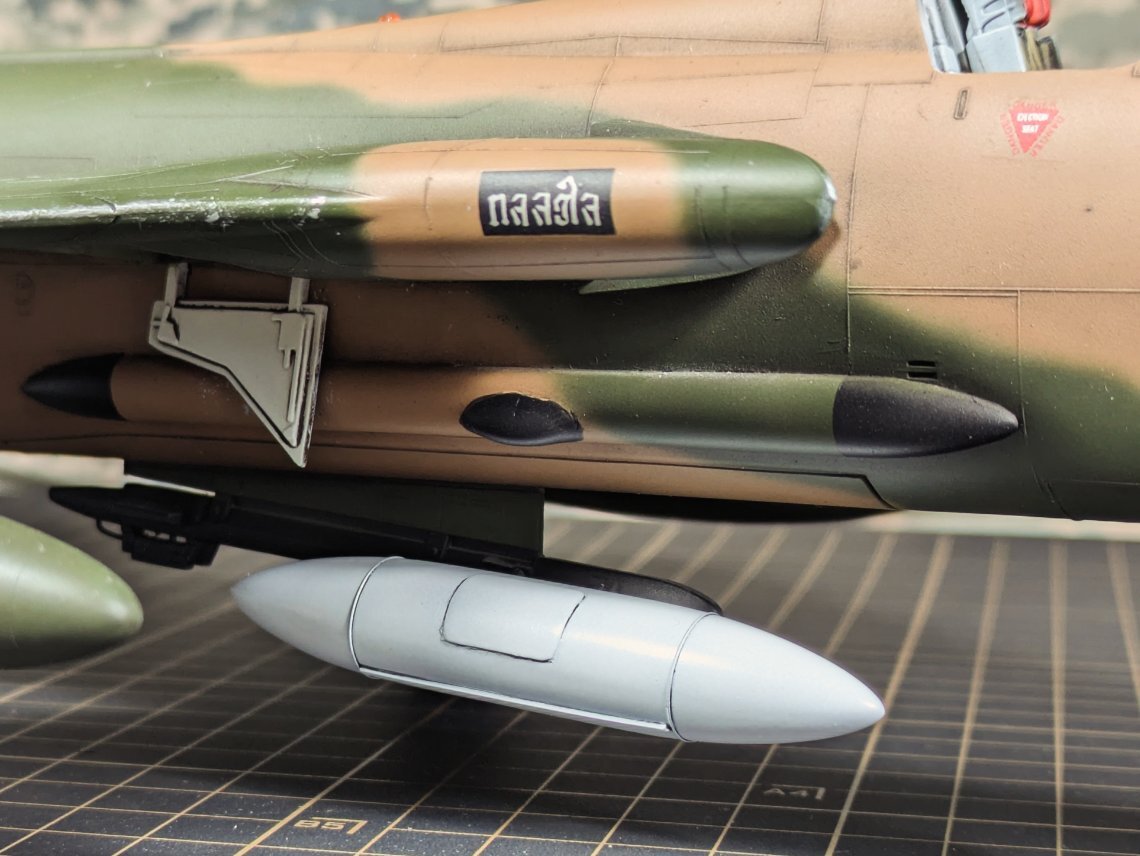
Luggage pod from the side - scratch-built from F-84 drop tanks, painted gloss white.
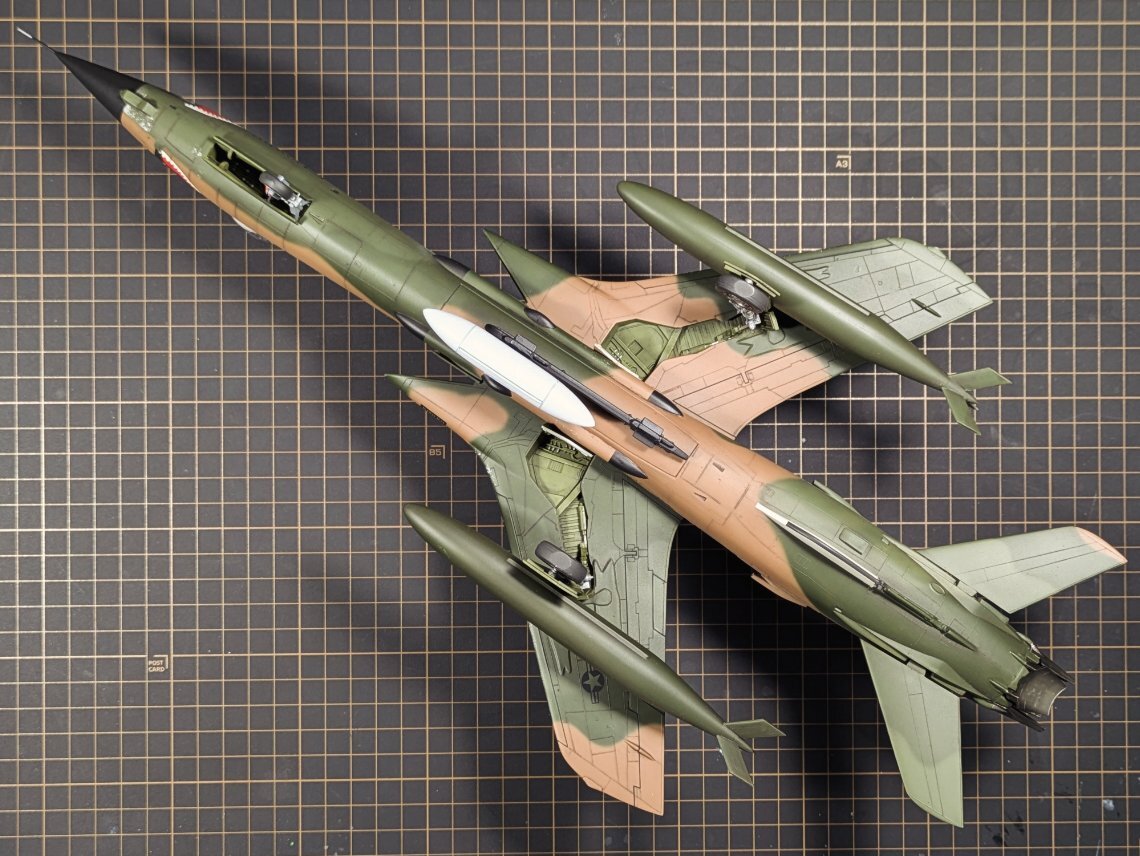
Underside - ECM pods, luggage pods, and fuel tanks visible.
Four Super Scale Sheets & Mark Setter / Softer
Markings were sourced from four different Super Scale sheets from Kyle's stash - likely also vintage 1980s stock. A coat of Tamiya LP-9 Clear Gloss was laid down first to give a smooth, non-porous surface that prevents silvering. Mr. Mark Setter was applied to the surface before each decal, and Mr. Mark Softer over the top to conform the film into surface detail.
Heavy Sepia Oil Wash & Sponge Chipping
Weathering was applied in two distinct phases. First, a heavy overall wash of Abteilung Sepia oil paint - applied thick, allowed to dry, then scrubbed back with a brush, leaving as much as possible concentrated around the raised panel lines. The result reads as accumulated grime and sun-bleached fading consistent with a hard-worked ANG airframe.
Chipping was done in two tones as per the reference photos: Vallejo Silver applied with a sponge for broad, bright chipping, then Chainmail (a darker silver) for heavier wear concentrated around the refuelling receptacle on the nose.
The Finished Build
62-4425, Georgia Air National Guard. Wild Weasel. Last Linebacker II mission.
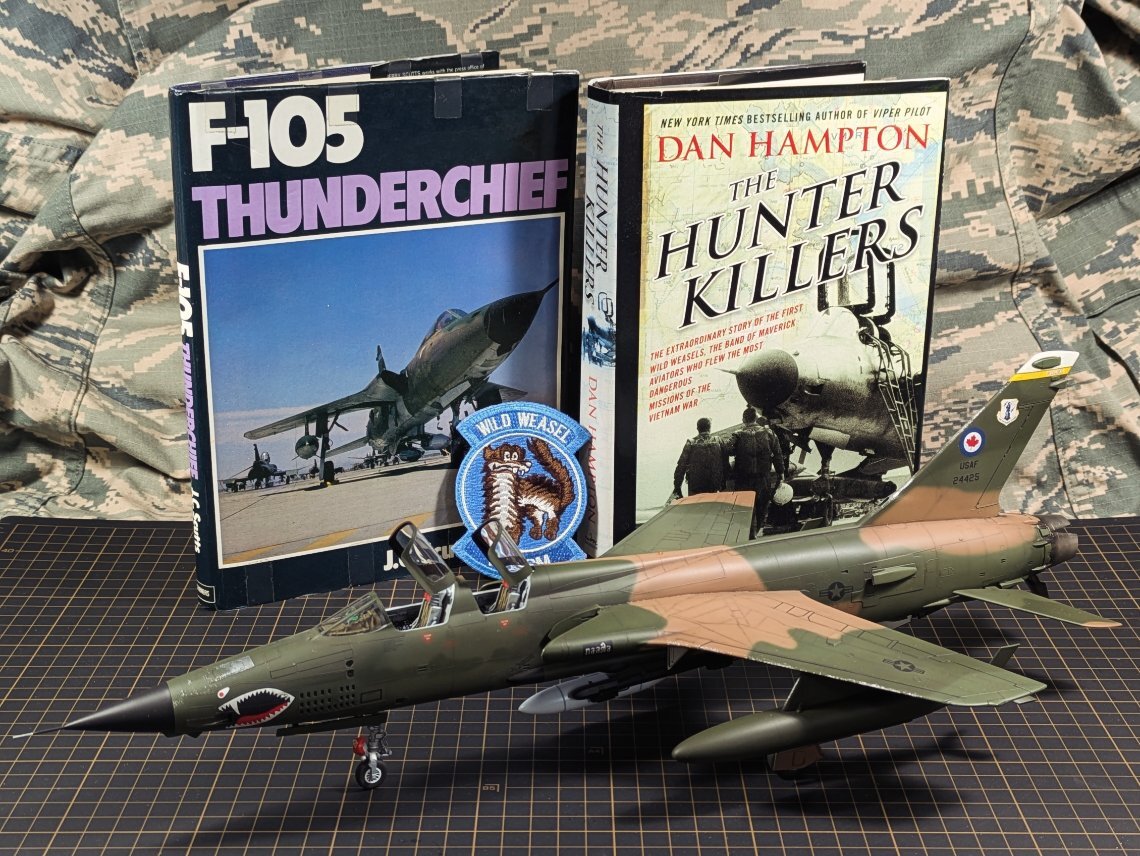
Three-quarter front - reference books and Wild Weasel badge
Three-quarter front
Three-quarter rear
Three-quarter rear - RCAF roundel on fin
Underside - ECM pods, luggage pods, fuel tanks.
The Monogram 1/48 F-105G Wild Weasel is in stock at Wheels & Wings Hobbies in preowned condition. All paints and supplies used in this build are available in store and online with Canada-wide shipping.
Recent Posts
-

Kyle's World Eater Paint Guide - Chaos Legionnaire Build Feature
Wheels and Wings Hobbies - Miniature Paint Guide Kyle's World Eater - Sons of Angron Warhammer 40,00 …Jul 22, 2026 -

Decal Solutions Explained: Setter vs Softer vs Adhesive
Wheels & Wings Hobbies · Counter Notes Setter, Softener, or Adhesive? Choosing the Right Decal Solu …Jul 21, 2026 -

Kyle's Ultramarine Apothecary Biologis Paint Guide - Gravis Armour Build Feature
Wheels and Wings Hobbies - Miniature Paint Guide Kyle's Ultramarine Apothecary Biologis Warhammer 40 …Jul 21, 2026