

How to Paint Black — Techniques, Highlight Colours, and What Actually Makes It Work
How to Paint Black: And Why It's Harder Than It Looks
Weekly column · Lessons from the paint counter at WWH · June 2026
Black comes up at the counter differently from most colours. People don’t usually bring us a finished model that went wrong. That scenario belongs to white and yellow. With black, the hesitation happens earlier. Someone is planning a scheme, they know the army is predominantly black, and they are not sure how to approach it. It looks like a dead end before they start: no obvious shadows to paint in, no clear highlights to build toward, just a single flat value with nowhere to go.
This is a double feature. Black and white are commonly called the two hardest colours to paint well, and they fail in opposite directions, which makes comparing them instructive. Last week’s article covered white. This week is black.
- Do a zenithal before black goes down. Prime black, then lightly overspray grey from 45° and white from directly above. This builds a value gradient into the surface before you paint a single stroke. Recesses stay black, raised surfaces get the light. Everything you apply over it will read with natural depth already in place.
- For armour, highlight with a cool blue-grey progression, not plain grey. The standard approach: Dark Reaper as a first edge highlight across all panel edges, Thunderhawk Blue on the top edges only, Fenrisian Grey on the sharpest corners. This is what makes black armour read as metal rather than as flat black paint. Plain neutral grey highlights produce a different (duller) result.
- The highlight colour is a deliberate choice, not a default. Blue-grey (Dark Reaper/Thunderhawk Blue) for hard metallic armour. Neutral grey (Mechanicus Standard Grey/Dawnstone) for a more understated, worn look. Warm grey-brown for aged leather or weathered cloth. You are choosing how the surface reads, not just adding contrast.
- Control finish consistently. Gloss patches on matte black are immediately visible. Seal uniformly, or problems will show more on black than on any other colour.
Black vs. white: the same problem in mirror image
White is hard to cover. Black is hard to make interesting. The techniques that solve one make the other worse.
White paint has a coverage problem: titanium white pigment is physically the same density as most acrylic binders, which means it scatters without blocking, producing translucent, streaky coats that require multiple passes and a careful undercoat to resolve. The technique answer is building up via mid-tones from a grey base rather than chasing full coverage with undiluted white.
Black has the opposite structural problem. Carbon black pigment has extremely high opacity. It covers in one or two passes without difficulty. The problem is that pure black already sits at the bottom of the value scale. There is nowhere darker to shade into, which means the entire visual depth of a black surface has to be created above the base colour, in the highlights.
On a mid-tone colour like blue or green, the painter works in both directions from the base: darker into the recesses with a wash or shade, lighter on the raised edges with a highlight colour. Black removes the downward direction entirely. A wash over pure black achieves almost nothing visible. All the contrast has to be built upward, which means the highlight colour carries far more weight on a black model than it would on any other colour.
The other compounding factor is finish. On most colours, a slight sheen or matte inconsistency reads as minor. On black, finish variation is immediately obvious. A glossy patch on a matte black surface stands out far more than the equivalent inconsistency on red or brown. This is why finish control matters more on black models, and why scale modellers and miniature painters often reach for different blacks for different applications.
The problem with painting pure black and leaving it
Black basecoated and left reads as a silhouette. The solution is to build depth into the surface before black goes down, not chase it afterward.
A model basecoated black with nothing else applied reads as a flat dark shape under most lighting. Surface detail disappears. The eye has no value gradient to follow. On any other colour you can deepen recesses with a wash and bring up edges with a lighter tone. You are working in both directions from a midpoint. Black removes the downward direction entirely. A dark wash over black achieves almost nothing visible. All the contrast has to be built above the base, which is exactly why the approach has to be different.
Start with a zenithal before black goes down
The most effective way to handle black is to establish a value gradient before you apply any paint at all. Prime in black, then overspray grey from roughly 45° so it covers the upper surfaces of the model while leaving recesses and undersides black. Then hit the very top surfaces only (the highest points of the head, shoulders, raised armour panels) with a light pass of white from directly above. The result is a model that already has shadow in the deep areas and light on the raised geometry, with nothing painted yet. Everything you apply over this will inherit that depth automatically. Without an airbrush, the same effect can be achieved by spray priming black, then drybrushing progressively lighter greys over the top. This is the basis of the Slap Chop method and works well for batch painting.
Edge highlighting: what colour, specifically
Where manual edge highlighting is needed (and it usually is, even over a zenithal) the colour choice determines what the surface reads as. The standard approach for hard metallic black armour (Iron Hands, Raven Guard, Black Templars, Deathwatch) is a cool blue-grey progression rather than plain grey. In practice: Dark Reaper as a first, wider edge highlight across all panel edges; Thunderhawk Blue as a second, thinner line on the top edges only; Fenrisian Grey on the sharpest corners and most prominent points. The blue undertone reads as light reflecting off a hard, polished surface. Plain neutral grey produces a softer, more worn result. It is correct for weathered cloth, leather, or vehicles that have seen use, but not for crisp parade-ground armour.
For a more understated scheme, Mechanicus Standard Grey followed by Dawnstone is a one-step and two-step version of the same idea in a cooler, less saturated tone. Warm grey-brown highlights (Stormvermin Fur, Baneblade Brown) produce black that reads as aged, dirty, or organic. That is right for worn leather pouches, cloth, or battlefield-worn armour that has lost its gloss.
Drybrushing the whole model with progressively lighter greys over a black base is faster and works well for texture-heavy surfaces like fur, stone, and basing material. On smooth armour plates it lacks the control of edge highlighting and can look chalky if overworked. Both are valid; the surface and the time available determine the choice.
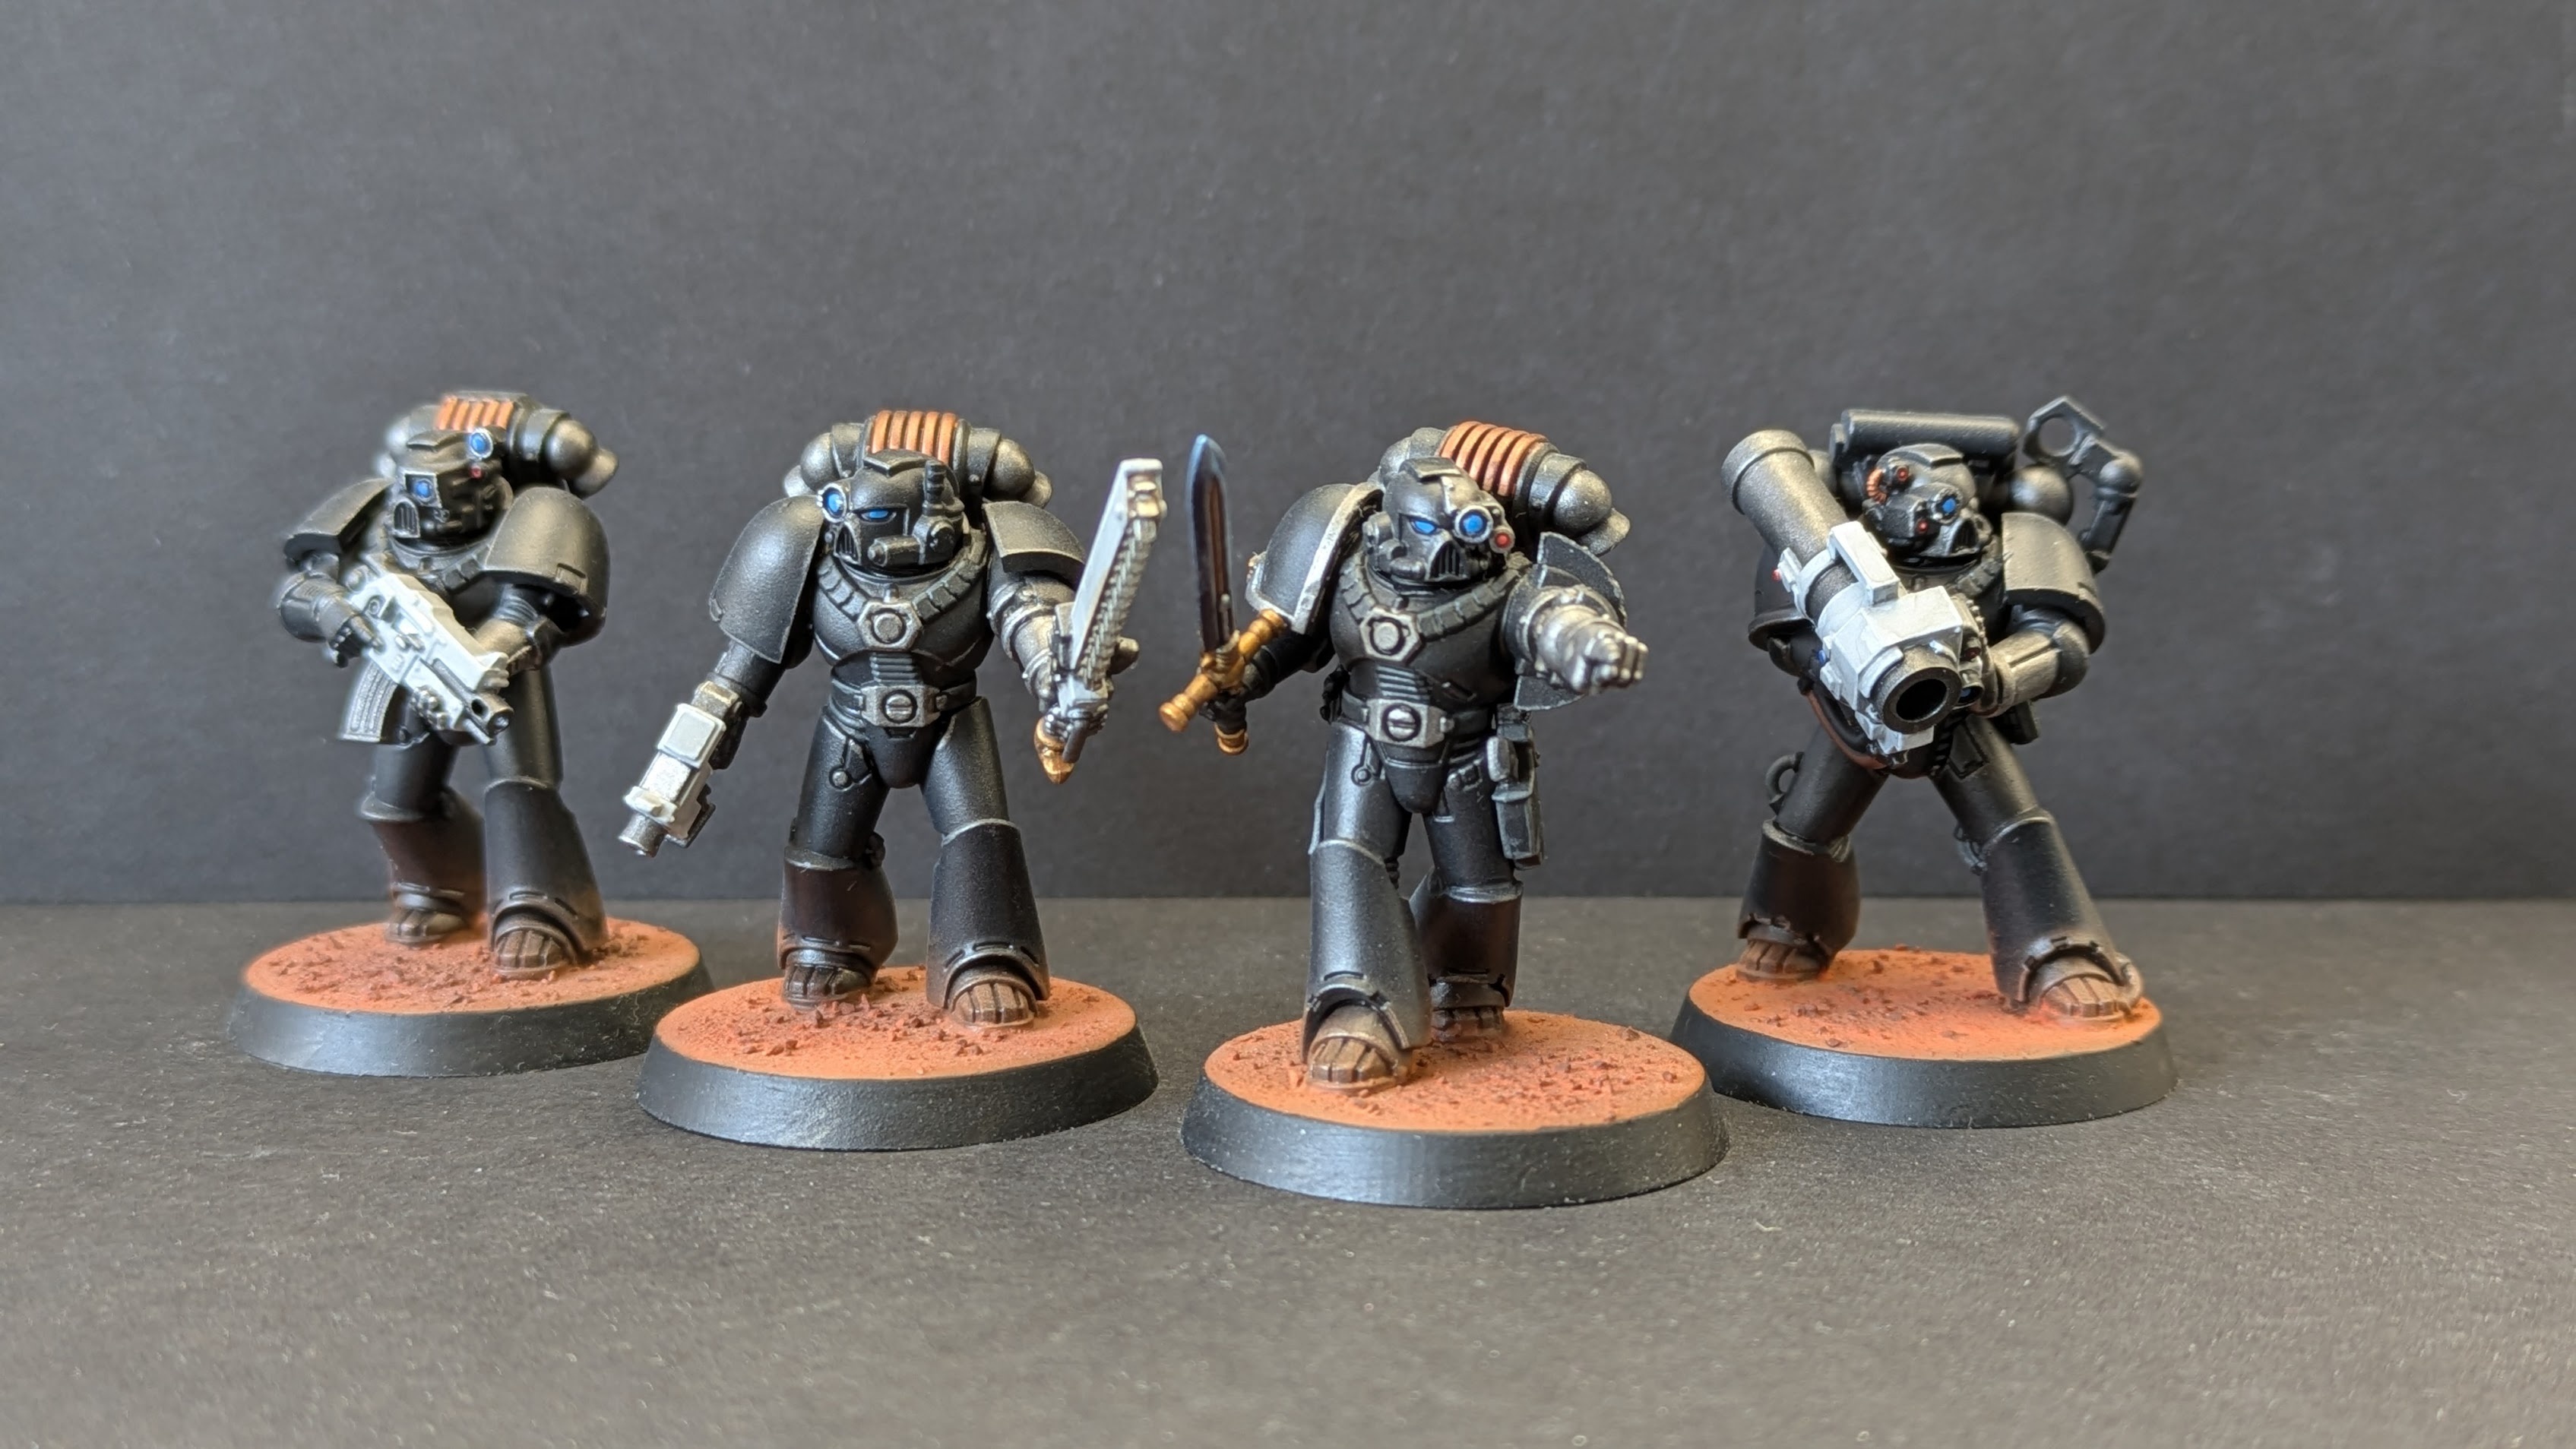
An alternative to zenithal: metallic pigment highlight
Kyle's Iron Hands were done a different way entirely: pure black basecoat, then highlights applied with a metallic pigment rather than a grey. Simple on paper, but the key is what happens after: seal with a satin varnish instead of matte, and the natural light hitting the model does the depth work for you. The slight sheen means the geometry reads differently depending on the angle and light source, adding dimensionality without a zenithal or layered highlight progression. It is a legitimate shortcut if the zenithal process feels like too many steps. The tradeoff is that the result depends more on how the model is lit and displayed than a zenithal does.
How to do a black scheme without black paint
Starting from a dark grey gives you a midpoint to work from. Something pure black never has. The result reads as black at arm's length and has built-in tonal variation up close.
The approach works because Mechanicus Standard Grey reads as near-black in most lighting conditions while giving you a genuine mid-tone to shade down from and highlight up from. You gain the downward direction that pure black removes. Recesses can be deepened with a dark wash and actually show, which is impossible over black. The finished model looks black to anyone looking at it on the table.
Step by step
Basecoat in Mechanicus Standard Grey. Full coverage over the primed model. This is your black stand-in. Dark enough to read as black, light enough to have room above and below it.
Wash the recesses. Nuln Oil into all the panel lines, joints, and recesses. Because you are starting from a grey rather than black, the wash actually reads. It darkens the deep areas visibly and pushes contrast into the model in a way that the same wash over pure black never would.
First edge highlight: Dark Reaper. A wider line along all panel edges and raised geometry. Dark Reaper is a very dark teal-grey that reads almost as a colour accent rather than a pure highlight. It adds a cool, slightly blue quality that lifts the surface without jumping too far in value.
Second edge highlight: Thunderhawk Blue. A thinner line on the top-facing edges only, where direct light would catch the armour. Thunderhawk Blue pushes the blue-grey quality more strongly and starts to suggest the reflective sheen of a hard surface.
Sharpest points: Fenrisian Grey. The smallest, brightest marks: corners, the very tip of raised edges, prominent studs. These are the specular highlights that tell the eye this surface is hard and light is catching it. Keep them small; less is more at this stage.
If you want to stop at two steps rather than three, Mechanicus Standard Grey basecoat into Dawnstone edge highlight is a faster version that produces a more neutral, slightly warmer tone. It reads as a worn or dusty black rather than a crisp metallic one, suited to infantry equipment, vehicles, and anything that should not look freshly polished. For batch painting entire squads, Dawnstone Dry over a Mechanicus Standard Grey base is even faster. One drybrush pass picks up all the raised geometry at once.
The complete five-step route takes more time but produces a result with genuine tonal depth at every level: deep recesses, a dark mid-tone, a cool first highlight, a brighter second highlight, and sharp specular points. Each step builds on the last. Anyone looking at the finished model will read it as black.
The thread running through black and white
Both colours are difficult for the same underlying reason: they start at the very end of the color spectrum in terms of light and dark meaning they have no natural midpoint to work from. The standard practice of highlighting and shading are kind of flipped on its head. White is all highlights and relies entirely on a darker base to establish form. Black is all shadows and relies entirely on what goes above it to establish form. In both cases, understanding why the colour behaves the way it does gives you a reliable way to work with it.
For black specifically: the work happens before and after the black goes down, not during. A zenithal establishes the depth before the basecoat. The right highlight colour, applied to the right edges, is what turns a flat black surface into something that reads.
Quick reference: black paints and primers we stock
| Product | Finish | Best for |
|---|---|---|
| Water-based acrylic | ||
| Citadel Abaddon Black (12ml) | Flat | Miniature base coat. Dense, opaque, matte. The standard starting point for Warhammer black armour, weapons, and cloth. |
| Vallejo Model Color Black (17ml) | Flat | Miniature base coat and airbrushing. Dropper bottle makes consistent dilution easy. Compatible with full Vallejo system. |
| Vallejo Mecha Black Primer (200ml) | Flat (primer) | 200ml makes it economical for batch airbrushing. Because it's black, it doubles as your basecoat. Primer and base colour in one pass, no separate step needed. |
| AK Interactive 3G Black (17ml) | Flat | Miniature and light scale model use. Good flow properties for flat surface coverage. Compatible with AK Interactive system. |
| Hybrid acrylic (alcohol-based) | ||
| Tamiya XF-1 Flat Black (10ml) | Flat | Scale model workhorse. Levels out of an airbrush, accepts enamel washes. Tyre bases, anti-glare panels, track links, zenithal pre-shading. |
| Tamiya X-1 Gloss Black (10ml) | Gloss | Polished metal effects, pre-decal base coat (prevents silvering), gloss black panels. Also used under enamel washes to make cleanup easier. |
| Mr. Hobby Aqueous Flat Black H-12 (10ml) | Flat | Gundam and Gunpla. Standard flat black for panel interiors, vents, and frame components within Mr. Hobby’s acrylic system. |
| Enamel | ||
| Tamiya XF-1 Flat Black Enamel | Flat | Panel line washes and pin washes on armour and aircraft. Apply over cured acrylic or lacquer; clean up with enamel thinner. Not a base coat. |
| Lacquer | ||
| Tamiya LP-3 Flat Black (10ml) | Flat | Fast-drying base coat for scale models. Excellent adhesion and durability. Compatible with enamel washes over the top. Requires ventilation. |
| Tamiya LP-1 Gloss Black (10ml) | Gloss | Deep gloss black bodywork, pre-decal base coat, pre-metallic base for deep shadows. Mirror finish when polished. Requires ventilation. |
| Mr. Color C-33 Flat Black (10ml) | Flat | Gunpla and Japanese kit standard. Accepts panel liners and decals cleanly. Industry baseline for Gundam frame interiors and dark armour panels. |
| Mr. Color C-2 Gloss Black (10ml) | Gloss | Deep gloss base for RG and MG Inner Frame panels, metallic effects, and high-gloss display builds within the Mr. Hobby system. |
Frequently Asked Questions
For hard metallic armour (Iron Hands, Raven Guard, Black Templars, Deathwatch) use a cool blue-grey progression: Dark Reaper as a first edge highlight across all panel edges, Thunderhawk Blue on the top edges only, Fenrisian Grey on the sharpest corners. The blue undertone reads as reflected light on a polished hard surface. For a more understated or worn look, Mechanicus Standard Grey into Dawnstone achieves the same structure in a cooler neutral tone. Warm grey-browns (Stormvermin Fur, Baneblade Brown) are for leather, worn cloth, and heavily weathered surfaces. The wrong answer is plain mid-grey applied once. It produces a result that looks dusty rather than lit.
A standard dark shade wash (Nuln Oil, Agrax) over pure black achieves almost nothing because black is already at the bottom of the value scale. A dark wash has nowhere to go visually. What does work over black is a coloured wash that shifts the hue slightly: a blue wash over black armour adds depth and a cool metallic quality that flat black lacks. Some painters apply a thin purple or blue wash into recesses and panel lines of black armour specifically to give the shadows a colour character. Test on a scrap piece first; the effect is subtle but real.
Tamiya’s acrylic range (X, XF prefixes) uses an alcohol-modified acrylic formula that thins with Tamiya acrylic thinner or isopropyl alcohol. It is safer to use indoors than lacquer but slower-drying. Tamiya’s lacquer range (LP prefix) uses a stronger solvent base, dries significantly faster, and bonds more aggressively to the surface. Lacquers are generally preferred for airbrushing large surface areas and for builds where subsequent enamel washing is planned. They require proper ventilation. If you are brush painting or working at a small scale, Tamiya’s acrylics are the more practical choice.
This is covered in more depth in our paint compatibility guide, but briefly: lacquer over cured acrylic is generally risky. Lacquer solvents can attack acrylic layers, especially water-based acrylics, causing wrinkling or lifting. The reverse (acrylic over lacquer) is the safer direction. When in doubt, do a quick test on a scrap piece before committing to a full model.
Pricing reflects Wheels & Wings Hobbies retail in CAD as of June 2026. Product availability subject to change. Counter Notes publishes weekly, drawing on what we see and hear at the paint counter in Toronto.
All products listed are stocked at Wheels & Wings Hobbies in Toronto and available online with Canada-wide shipping.
Shop Paint →Recent Posts
-

Getting Into Weathering: What to Buy and Where to Start
Wheels & Wings Hobbies · Counter Notes "I Want to Get Into Weathering, What Do I Buy?" Weekly colum …Jul 30, 2026 -

Kyle Builds the Heller 1/72 T-28 Fennec - French Algeria Build Feature
Wheels and Wings Hobbies - Scale Model Build Feature Kyle Builds the Heller 1/72 T-28 Trojan "Fennec …Jul 30, 2026 -

John's Trench Crusade Sniper Priests Paint Guide - Build Feature
Wheels and Wings Hobbies - Miniature Paint Guide John's Trench Crusade Sniper Priests Trench Crusade …Jul 23, 2026