null

DUE TO ONGOING LABOUR ACTION, CANADA POST SHIPPING HAS BEEN SUSPENDED. PLEASE USE UPS OR "INSTORE PICKUP"

Tamiya

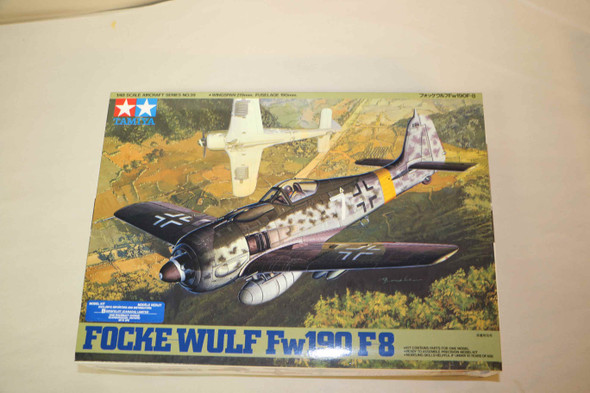
TAM61104 - Tamiya - 1/48 Focke-Wulf Fw190 F8/9 with loader (Discontinued)

SKU:
TAM61104
UPC:
495034461104
Condition:
New
Availability:
In-Stock items usually Ship within the next business day
  • TAM61104 - Tamiya - 1/48 Focke-Wulf Fw190 F8/9 with loader (Discontinued)
  • TAM61104 - Tamiya - 1/48 Focke-Wulf Fw190 F8/9 with loader (Discontinued)
  • TAM61104 - Tamiya - 1/48 Focke-Wulf Fw190 F8/9 with loader (Discontinued)
  • TAM61104 - Tamiya - 1/48 Focke-Wulf Fw190 F8/9 with loader (Discontinued)
  • TAM61104 - Tamiya - 1/48 Focke-Wulf Fw190 F8/9 with loader (Discontinued)
  • TAM61104 - Tamiya - 1/48 Focke-Wulf Fw190 F8/9 with loader (Discontinued)
  • TAM61104 - Tamiya - 1/48 Focke-Wulf Fw190 F8/9 with loader (Discontinued)
USD$42.91

Description

61104 - Tamiya - 1/48 Focke-Wulf Fw190 F8/9 with loader

The model

[review image]This latest offering from Tamiya gives you more than the previous F-8 release from Tamiya. You get the typical perfectly formed light grey plastic styrene sprues. The parts feature recessed panel lines. A sprue of clear parts has two types of canopies included. Some poly caps are included to allow the prop to be moved. The decal sheet has markings for three aircraft, one F-9 and two F-8s. The instruction sheet is typical Tamiya and easy to understand.

In this release you get an additional sprue. This sprue, Sprue N, gives you the additional parts necessary to build the F-9 including the larger prop blades and 14 blade cooling fan Also included on the sprue are two wheel chocks, two different style of bombs (AB250 and SC250), landing gear covers without the lower panel, an LWC500 bomb loading cart, and two figures to operate the cart. Another nice touch is the inclusion of a sheet with canopy masks. Strangely you have to cut them out but they are at least included.

The cockpit

Things start in the cockpit as usual. The only thing different here is that you have to remove the center panel and replace it with a longer armament panel. Everything else is quite nice. I painted the interior RLM 66 with a wash of Lamp Black artist oils and dry brushed with RLM 02 and silver. Decals are provided for the seatbelts. I left them off until the final assembly.

The fuselage

The fuselage fit perfectly. It is Tamiya did you expect anything different? The cockpit fits from underneath and guess what? It fit perfectly.

The wings

You have to decide which armament that you want to add at this time and open the appropriate holes. I wanted to do the rockets as I didn't have a model with them. Just as good a reason as the next. The holes for the drop tank mount also have to be opened. The upper wing outer bulges also need to be opened up to mount on the wings. Once that is done the wings fit, well you guessed it, perfectly. The insert panels did require just the slightest amount of sanding to allow them to fit flush.

Offering the wings to the fuselage represented no problem. The fit was not perfect at the aft area under the fuselage. I did have to fill with super glue and rescribe the panel. Nothing dramatic but it wasn't perfect. Stop the presses and alert the media, I had to use some filler.

The horizontal stabilizers fit, oh heck you know how they fit.

The engine

The engine is painted flat black and dry brushed silver. Can you see it? Me neither it sits so far back. Anyhow it fit on its block perfectly. Don't forget the exhausts on the side and the bottom of the wings. The engine cowling fits perfectly.

Truthfully up to this point I had spent about three hours on the model and was ready for paint. This was truly amazing even for me.

Painting

[review image]I washed the model with Dawn dish detergent and the openings such as the engine and cockpit were masked off. You have to cut out the canopy masks from the backing paper. The masks were a nice touch but having to cut them out was annoying. I just made sure that the blade was brand new and I had no issues. I used a straight edge where they were called for and free handed the rest. Just cut on the line and take your time and you'll be rewarded with some great masks.

Then I preshaded with RLM 66. There are some questions on what the forward cowling was painted like. I opted for a yellow lower cowling and a lighter colored band around the cowling. I used Gunze RLM 04 for the darker shade of yellow on the cowling and the rudder. After masking, Model Master Acrylic RLM 04 lightened with flat white was added to the cowling. Masking it off it was time to add some camouflage.

The model was then sprayed with Model Master Enamel RLM 76. Gunze RLM 75 was sprayed on the upper surfaces and in a mottle on the side of the fuselage. Gunze RLM 82 Dark Green was freehanded to the camouflage. After the initial colors were laid down all the colors were lightened up with some white to add some depth to the finish and break up the monochromatic look of the camouflage colors.

I elected to paint my spiral on the spinner as opposed the decal. This really was just a matter of the way I normally do it. The whole spinner was painted flat white and when it was dry I cut out a circle for the front and then used cut Tamiya tape to establish the twist and painted the spinner flat black.

[review image]The bombs were assembled and painted in different colors. The SC250 was painted RLM 02 and the AB250 was painted Panzer Yellow. The AB250 did not turn out as nice as I would have liked, but it is okay to use. It is engineered in four pieces instead of the standard two-piece.

Since I elected to use the Panzerblitz rockets I painted the launcher as per the instructions with semi-gloss black. Lacking references I had to use the Tamiya instructions and painted the rockets with Model Master Metalizer Dark Anodized Grey.

There are only two photos that I had in my collection of the airplane I wanted to do, an F-9 Green "Tech Chevron" of the Technical Officer for II/SG1. I tried my best to match the camouflage pattern on the fuselage.

A coat of Alclad gloss was added with my GREX Genesis.XT airbrush. I love this airbrush, especially for this application.

Decals

[review image]The kit decals looked really thick on the decal sheet so I opted to only use the stencils from the sheet since they were designed for the kit. For the aircraft markings I had an old Third Group decal sheet for the same aircraft so I opted to use those decals. I used MicroSol to wet the surface and then Solvaset for the top of the decals. The kit and the Third Group decals both reacted well with these solvents. There are some decals on the bombs so don't forget them.

A coat of Alclad Gloss and Dullcoat were added in preparation for weathering. In retrospect the kit decals laid down perfectly and did not prove to be thick at all. You can't tell which decals are the kit's and which aren't. Tamiya decals are perfectly fine and work really well.

Some small bits

The wheels fit really loose on the axle of the landing gear. The instructions have a template for mounting the wheels. I used some Tic-tac to align the strut and then five minute epoxy to align the wheel. This ensured that the wheels were set at the proper angle. Adding the landing gear let me have the model sit up on its wheels for weathering. The fit of the landing gear was a pain to establish but working with five minute epoxy I had plenty of time.
View AllClose

Additional Information

WWCTL:
99979482
Scale:
1/48
View AllClose